Showing posts with label birds in watercolour. Show all posts

Dec 25, 2023

Major Change !!! Added a New Colour to my Palette - Painting & Drawing Tips

Do you have a Basic Palette?  
A collection of colours that are your 'Go To' colours? 

CHICKADEE: WINTER WHISPERS - 11 X 14,  $600 Varnished Watercolour on Wood Cradle 
 
As an Outdoor Sketcher, you know you must pack light and work quickly. Light, weather and life keeps you on the go.  So a small well set up Travel Palette is vital to your success.  

Several years ago I moved to my present Travel Kit - see My Really SMALLmendous Art Kit.  It has proven to be Amazing!  My palette is small enough for light weight travel and big enough to meet any challenge.   I have used it while balancing on a rocky ledge, floating in my kayak, and relaxing comfortably on an airplane. It has come through with flying colours.  

My Trusty Paint Palette - notice the 1 empty pan


The most important element of my travel kit is my paint palette.  It's where the main action happens. It holds 12 paint pans.  But as you can see, one is empty.  I have left it that way for some time.  Unsure of what I wanted to put there.  

 ___________________________________________________________________

*** Further discussion can be found on my YouTube video: Great News!! A new Colour for my Travel Palette 

*** Looking To Join Me for Online Drawing Lessons? 3 Live Online Classes in February. See below for more information

________________________________________________________________


Yes, I use other colours besides these when painting in my studio but  . . .

You know what it's like.  You pull in a new colour for those one or two paintings.  The colour works for them but then you don't seem to use it again for awhile.  It seemed very important to me to find 'the right colour' to fill that spot.  

Well I found it!!!  

The winner is "Payne's Gray" (PG).   I can't say it was a new colour to me.  It has certainly been in the mix on my large studio palette. But I seemed to always shy away from it.  I was concerned I would end up with 'mud' when mixing it with other colours.  I would now like to apologize to that Gray.  I was wrong. 

Note the Great Greens, Purples and Browns

It really come to the forefront when I was looking for a quick dark.  In Outdoor sketching you often do not have time to mix a lot of colours. The instant 'blacks' that I tried were just too black and didn't seem to mix well with my other colours.  (I know we all have our own preference for how we depict  shadows.  Often I want them warm and I just found the blacks too cold)  I found that Payne's Gray gave me a great dark and also one I could 'push' in any direction: warm or cold.  

Loved the mixes with the blues and reds, both mixed and glazed over


Payne's Gray mixes really well with my other colours in my palette.  Most of the colours are transparent, non-staining colours. Adding PG to them muted the hues.  I especially loved the new blues, browns and greens I could quickly mix
.  
Rocky Shore on Gabriola Island - Note the great variety of greens in the tree.  

By itself, PG presents a lovely variety of blue to gray hues that can be both warm and cool.  But when the paint is thick, it gives a really dark colour. 

As a person that loves to use lots of glazing with my watercolours, PG responds really well.  Check out the branch that my Chickadee rests on, in my painting at the top of this post. ↑↑↑ Look at the lovely gray it makes for the branch and note the rosy colouring in the shadows.  So Neat.  

I would love to know what some of your "Go To" colours are.  

See Below my Online Drawing Classes for February 2024 and let me know if you are interested in my Outdoor Sketching Classes this summer or the all inclusive 4 Day Art Retreat,  June 21-24


Enhance Your Drawing Skills

Come Draw with Me 

“I attended an online drawing class from Wendy. I loved it and learned so much. She is very thorough and provides terrific feedback on your works of art. I highly recommend it.”

Ready to Enhance your Drawing Skills and Explore new Mark-making Techniques in a relaxed, fun setting? 

During your Lessons You will:

- Learn 
when it’s best to erase and when to wait

- Dive into the little Secrets that make drawing a success

- See how light can transform your subjects

- Make friends with your inner critic and make it work for you

- Nail down that perfect perspective and proportion

- Use lines, shapes, and shadows to guide your viewer’s eyes and keep them engaged in your work

Online Drawing Classes

Feb 15, 22, & 29, 2024, 5:30-7:30pm (PT)

Early Bird $75 Before Feb 12, $90 after

Contact Wendy toRegister 
Gift Certificates Available 


Original work, Commissions, Private Drawing Lessons, Prints and Cards of her Work, 

Be sure to like and share my posts.  You won't miss a single post if you Follow by Email 
Have a great Artful Day,


Wendy

Apr 4, 2023

3 Strategies that Produce Good Reference Pictures for Painting - Painting & Drawing Tips

Spring Weather is Here!!! 
While it's here today anyway.  Hopefully it is here to stay.  

This is the time when you grab your camera and start taking pictures for new works.  Everyone has a camera now, thanks to Apple.  And of course those cameras are clicking steadily.  

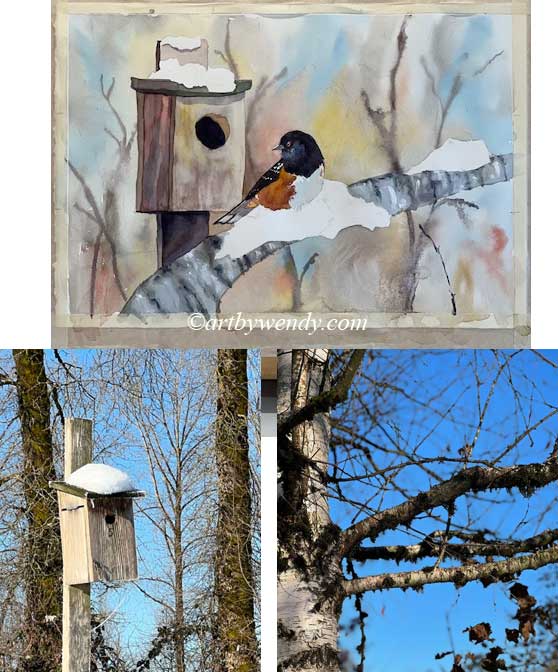
Closed for the Season - Watercolour, 16 x 20 Matted $550

But are you getting good reference pictures that you can work with?  

As a Wildlife artist I am constantly looking for wildlife and settings that would make for a nice place to put my wildlife.  Why am I looking for settings you ask.  Well, I find birds and animals don't always pick the best spot to be photographed.  A bird perched on a wire is not as interesting as one on a branch in the forest.  But its the birds on the wire that sit the longest for those good shots!!

Needless to say, I have tons of Reference Pictures. But when I go to paint with them, I realize many are useless.  Here are some of things I found very helpful when taking my shots.  

3 Strategies That Produce Good Reference Pictures

1.  Good lighting: Take reference pictures on a sunny day to get great shadows to work with.  Sure you can see all the details in a picture on a gray day but when you paint it, it will be flat.  Those shadows bring things to life.  

Two Seagulls: one with shadow patterns one without.  

Here you can see two Seagulls. (I have reduced them to grayscales for better evaluation)   The one on the left is clear, every detail can be seen.  It has been shot in low light conditions, probably a gray sky.  The seagull on the right has sunlight and shadows. Not all details are clear, some are buried in the shadows.  But which seagull catches your eye.  The shadow and light on the face of the seagull on the right has a strong contrast that grabs and holds your attention.  That's what you need if you want a bit drama in your work.  

2.  Stay away from the noon day sun.  Early morning and early evening gives lovely cast shadows that add interest and unity to your work 

Bright sunlight directly on the subject really washes it out.  

The bright sun washes out the colour as well as many of the shadows that add depth to your subject.  

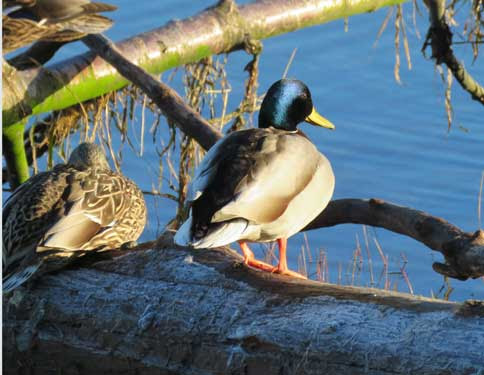
Ducks in the evening Sunlight

Notice how the ducks have interesting shadows and lights that catch your attention.  And the late afternoon/evening light although bright is not so harsh as to wash out their colour.  
Tulip in the early morning light

This single tulip has soft interesting shadows that makes interesting eye candy for the eye.  


3.  Take lots: Zoom in and out and with the same light direction.  This can be a real game changer for you.  Often you see a great subject and snap a few pictures.  But the problem starts when you go to paint it.  

Some of the Reference Pictures needed for the painting. 

I was well underway with my painting, Closed for the Season.   I had a good little picture of a birdhouse and Towhee but then I stalled.  I realized my snow on the branches was not working and the branches weren't really right either.  Fortunately it was snowy here at the time (we actually don't get much snow and it usually melts so fast you can't find any on the branches)  I went for a walk and really looked at snow on branches and the kind of branches and underbrush I needed for my background.  And of course took more pictures. You can see the finished picture at the top with the changes I made.   

So take pictures of not only the subject but zoom out a bit and include the surroundings.  Try and keep the angle of light the same.  The vegetation and bits of things in the area may be just what you need to finish off your background or foreground. 

Have fun with your Photos, your work will definitely reflect this extra knowledge of the surroundings. 


Awesome Opportunity - 2 Artist Retreats in the Shuswap

June 23-26 or September 15-18, 2023

Join me for 4 DAYS of Outdoor Sketching, nature walks, deck and beach time, creative conversations, gourmet meals and simply relaxing 

Your Hosts, Joanne Denis and Myself
Cost: $450 single room or $300 shared room
Art instruction, transportation (from Lower Mainland), meals and lodging included (Bring your own art supplies.  
Space is limited to 8-10 attendees, Register Early 


Original work, Commissions, Private Drawing Lessons, Prints and Cards of her Work, 

Be sure to like and share my posts.  You won't miss a single post if you Follow by Email 
Have a great Artful Day,
Wendy


Jan 24, 2022

Is SNOW really WHITE? - Painting & Drawing Tips

Well this year we had WINTER!!
Well for a few weeks anyway.  
It was cold. Really cold. Minus some ridiculous number cold!  We had snow.  Real snow. 12-14 inches of the stuff.  
A FLASH OF BLUE IN THE SNOW - 12 x 15 Vanished Watercolour on Wood Cradle   


Ok, I admit it.  I loved it!  

We had beautiful cold, crisp days, the sun was glistening off the snow and the mountains.  Fantastic!!  It was real powder.  None of our usual wet slushy stuff.  

Of course I had to PAINT it!

See what I mean, Snow is gray tones.  Not very exciting


When I looked at my snow reference pictures I discovered my camera had a common goal.  Use only White and Gray!  The snow was white and sure there were shadows, but they were usually tones of gray.  Not my idea of a great snowy scene.  

I decided to add some colour, my snow didn't have to be WHITE. . . .

First I went to my Resources: Stephen Quiller, a watercolour artist who's work I really enjoy.  He does lots of snow pictures and his snow is NOT WHITE.  

Then I chose my palette: I decided I would have pinks and blues for my snow colours as my Stellar Jay was going to be blue it would look good with my bits of ferns. I felt the soft glow of the pinks from the setting sun would give a nice punch to the whole picture. 

My colour chart for my snow - Light to Dark 


It was interesting to look at my colours in black and white.  It gave me a much better feel for their value.  
An easy way to see the tonal values of my colours - note how light the Cad Orange is. I was surprised at that.  

I studied my colours and arranged them from Light to Dark.  This helped me interpret the values on the snow with a colour.  I was surprised how light the Cobalt Teal Blue was.  It was my lightest blue.  And the Cadmium Orange, although very yellow, had a really light tonal value.  

Finally put Paint to Paper: 
Painting the Stellar Jay and my ferns was fun and fairly easy.  The kind of thing I am use to doing. But when I started on the snow I found I really had to take it slow.  Using colour for each area and assigning a value for each area did take me longer.  I found I needed to check my values as I went.  

The first section seemed so dark!!

When I did the first section I thought, OMG! That is way too dark.  . . . .
I kept checking things to make sure it was working out.  The more colour I put on the more things began to to work out.  In the end I had only a few very thin strips of white but my snow really read as Snow to the eye!! I found my eye really accepted all the colours, even the yellow and greens.  

I hope you are having fun with snow pictures too.  I think all of Canada and northern United States has snow now.  Give your snow pictures and infusion of colour.  I found it really makes me happy to see all the colour.  It reminds me of my walks on those sunny, cold crisp days.  I love the glow of colours in  the A Flash of  Blue in the Snow.  
 Move your work to NEW LEVELS?  

Contact Me for:

1. Private Drawing Lesson: (3 Sessions 2.5 hr each $250)  North Langley (Walnut Grove) 
Do you want your animals to breath, your flowers to sparkle or your people to walk?  Whatever subject your like to paint or draw I can build a drawing program for you.  Private Lessons allow you to focus on the skills you wish to develop.  Wendy is a experienced teacher, providing a calm, relaxing experience as you learn how to use the principles of drawing.  Beginner to Advanced are welcome.  Special rates for younger students.  More info here.

2.  Online: Teaching, Mentoring or Critiquing Your Work - Don't live in the Fraser Valley,  I would be happy to tailor a program just for you online.  Drawing and Painting Lessons, Mentoring you on your Art Journey or Critiquing Your Work with an Eye to Move It Forward.  Drawing & Painting Lessons: 1.5 hr sessions $75.  Mentoring or Critiquing 30 minutes sessions $25.  Flexible schedule and sessions can be longer or shorter depending on your goals. 

Be sure to like and share my posts.  You won't miss a single post if you Follow by Email 
Have a great Artful Day,
Wendy

Jan 16, 2020

5 Things that can spark a series of Painting - Painting & Drawing Tips

Have you ever worked on a Series of Paintings?  
Do you paint random pieces or are your works interrelated?
Is this a limiting exercise or not?

ROBINS: SIGNS OF SPRING - Nearly done 

From a marketing stand point, working in a series is wonderful.  You have a standard product.  You have a statement that covers all the work.  You have One central focus for all your marketing energy.  Sounds like a marketing dream. 

However, there is one problem . . 

As an artist you are not a machine.  You can keep producing the same material but eventually it will become stale.  You will lose interest and your work will reflect that.  And on the other end, your buyers may become weary of seeing the same thing. 

Ok sorry, I don't mean to confuse . . .

Are series a good idea or bad?  I feel they have lots of merit but at the same time they need to evolve and change.  If their purpose is to preserve 'the sameness' not such a good idea. In my mind, a series takes you on journey to explore.  You take ideas and work with them.  Finding your voice as you feel your way.  They cause you to think and expand your ideas.  When you feel you have told your story, they end. 

I have started a series.  Not sure how big it will be.  For now it is 3 pieces. 

Decided on a background and my main colours

What sparks a series?

1.  Your emotions: For me it was my struggle to mix my pen work into my wildlife art.  I had just completed my work on my Inktober Tangles 2019 project and I was pumped.  I wanted to do something with my tangles and patterns.  (Read more about Inktober Tangles 2019 here.)

I liked the 3 different views of this fellow - his quirky character called to me.  

2.  Your eye is caught: Like most of you I have huge folders with photos I have taken.  Mine are all about wildlife I see and settings that would work for them.  My photos are overtaking my life.  I was trying to sort, delete and file some of my pictures from this summer.  I know, an endless task.  Suddenly my eye was caught by a robin.  I had several shots of him, wondering about the yard.  Hmm. . . . I thought.  I can do something with him.

One was working well so definitely time to start planning the group

3.  Chance: My husband was busy making wood cradles for me as I needed some custom sizes for some commissions.  Of course, being the frugal person I am, (read cheap, if you were one of my kids) I suggested he cut up the scrap and make some small cradles for me.  We figured he could make 3-5 x 7 wood cradles.


Robin: On his Own - WIP  As he started to grow I began to really see how my other birds would fit in. Surprisingly my husband thought he looked interesting.  Hmm. . . maybe my robin will interest others.

4.  Desire to meet a challenge: As I walked the trails with Max I thought of my challenge - realistic birds (my robin) and abstract shapes (my tangle patterns).  What? How? Somehow, out walking with Max I can create better than in my studio.  Here my mind is free to ebb and flow in different directions.  An idea began to form. Suddenly I knew what I wanted to do. 

Robin: Curious - WIP  My second piece started to take shape. Now, I was starting to get excited.   I could see where I wanted to go.  

5.  Time: Christmas Commissions done, Christmas was over, and I actually had a bit of time on my hands.  Those robins were restless, my pens were calling, my paints were wet.  I couldn't stop myself.  I jumped in. 

What sparks a series for you?  Are they a small collection or large bodies of work? Have you considered the pros and cons of working this way? 

ROBIN: ON HIS OWN - Ink & Watercolour - 5 x 7 mounted on Wood Cradle $115

In continuing the discuss, you might find the following posts of interest: 

Do you Know Your Subject - Part 1
Looks at creating a series from the artistic point of view; benefits to the Artistic Soul. 

Do you Know Your Subject - Part 2
This looks at the benefits of creating a series from a marketing point of view.  

Do you Know Your Subject - Part 3
An interview with an artist, Jane Appleby, who spent a year working on her series.  


Do you Know Your Subject - Part 4
Short interview and examples of other artists and their thoughts on work in series.  


Art by Wendy Studio/Gallery is always Open

Looking to move your Drawing Skills to the Next Level?

Book a 3 Pack of Private Lessons with Me - 3 Lessons 2.5 hr each $225
Drawing/Painting lessons in graphite, ink, watercolour, watercolour pencils or coloured pencils Or any combination of these.
Flexible Schedule, at my Studio/Gallery, N. Surrey. 
Gift Certificates Available 

February is Marketing Month for Artists!!

Each February I offer an all day workshops “Let’s Get Your Art Out There!!”
2020 Date: February 23, 10-3pm
Having trouble getting started or knowing where and what to do?
This workshop gets your Marketing Plans fired up to new and more successful levels. Learn the basics of today’s Marketing World, learn how to develop markets both online with Social Media and off line in your community, learn how to develop a productive network, and set up a Marketing Plan that will work for you. Taking this workshop is a valuable step in moving your business forward. Workshop runs 10-3:00 pm with a lunch break.    Class limited to 8 people
Cost $90 Tax Incl      Pre-Registration Required, contact Wendy      Gift Certificates Available

Save the Date . . . . . 

January 18, 2020 - Opus Langley Demo:  Put WOW! into Your Mark Making with Wendy Mould, AFCA, CDM  11-12:30pm and 2-3:30pm.  Free but must Register: (604) 533-0601  Morning session is full but still some room in the afternoon.  

See you there!!


My Etsy Store is always OPEN: Etsy - WendyMouldsArt

Originals, Prints, Commission Work and Instant Printable Cards for all Seasons available.

Be sure to like and share my posts to keep me coming into your box, 
You won't miss a single post if you Follow by Email or Like my Facebook Page.
Have a great Artful Day,

Wendy


Nov 28, 2019

When is your Painting/Drawing Finished? - Painting & Drawing Tips


When is your picture Done?  Finished?
 What does DONE mean to you?
 How do you tell when your picture is finished?

VARIED THRUSH: DOWN FROM THE MOUNTAINS
 12 x 15 Varnished Watercolour on Board $400

For me,  the question is 'have I said what I want to say?"  I have goals for my work.  My first goal is to my subject, My Wildlife. I want my viewers to experience a special moment with my birds and animals.

I do a lot of hiking, boating and beach combing.
  For me there is nothing more special then turning the corner on the trail and seeing a Varied Thrush perched on a branch, a heron fishing the tide line or a deer resting under a bush.  Somehow it is a piece of Magic to experience nature in the wild.  I want to present that moment to my viewers. Make them feel how special that is.   

But that is only part of my goal  . . .

VARIED THRUSH, DOWN FROM THE MOUNTAINS: WIP 1
(I tend to work already my picture so I can get a feel for how my plans are working

I have goals as well, about the type of work I am doing.  My favourite mediums of choice are graphite, ink and watercolour.  I work with them separately and together.  As many of my readers are aware, my pen work has been drawing me more and more.  Combining my ink with watercolour is something I really enjoy doing.  However, usually it is my watercolour that shines and my pen work takes a back seat.  

My pens are not happy about that . . .

VARIED THRUSH, DOWN FROM THE MOUNTAINS: WIP 2 
I decided I needed a few more branches in the background as I wanted to leave the back white

This has lead me into several directions.  My abstract work combined with my ink work is one direction that I have followed. See Juncos at the Feeder below.   (See more in this series here)

JUNCOS AT THE FEEDER - 8 x 10 Vanished watercolour on Wood Cradle - $200

Another way of mixing my pen work with watercolour, is my more realistic drawings in ink surrounded by watercolour. See Pacific Harbour Seal: Sunbathing below.   In this series, only the setting has been painted.  The birds and animals are untouched.  I liked this, as it really brought my inkwork into the more primary role. (See more in this series here.)

PACIFIC HARBOUR SEAL: SUNBATHING - Matted 8 x 10, Ink & Watercolour.  $130

In my picture Varied Thrush: Down from the Mountains, (at the top of the post) I feel I have taken things one step further. Both my ink and watercolour are given staring roles.  And, there is a bonus.  It feel like you get a peak at the creation process as well.  I love this kind of feel. Its like you can see and feel the back story to the piece.  

So yes, I feel Varied Thrush: Down from the Mountains is finished. How do you feel?  Finished or Not?  In the end it is personal, the Artist makes the call. 

NB: Learn more about Vanish Watercolour on Board here


Have fun with your art work and see you in 2 weeks.  I will be busy next week with my show.  See Below.   ↓↓↓↓


Looking to move your Drawing Skills to the Next Level?

Book a 3 Pack of Private Lessons with Me - 3 Lessons 2.5 hr each $225
Drawing lessons in graphite, carbon, ink, watercolour, watercolour pencils or coloured pencils.
Based on your Schedule at my Studio, N. Surrey. 
Gift Certificates Available 


Christmas Comes early at Art by Wendy:Thurs Dec 5 to Sat. Dec 7, 10-4pm
Paints’n Bloom Workshops & Show & Sale
Mandeville Gardens, 4746 Marine Dr, Burnaby.

Featuring Artists Wendy Mould, AFCA & Audrey Bakewell
 in Support of the Alzheimer’s Society of BC.


See you there!!


My Etsy Store is always OPEN: Etsy - WendyMouldsArt

Originals, Prints, Commission Work and Instant Printable Cards for all Seasons available.

Be sure to like and share my posts to keep me coming into your box, 
You won't miss a single post if you Follow by Email or Like my Facebook Page.
Have a great Artful Day,

Wendy

Feb 28, 2019

Glazing Watercolour with Soft Edges - Painting and Drawing Tips

Stand Square.  Line up to the broom.  Bend down and grab the Rock. 
 Move back. Then Push off, Glide, Release. . .

That's it!!. . .

What happens to your curling rock now, is in the hands of your sweepers and the skip.  Skip calls the line and the sweepers call the weight.  All you can do is watch and wait. . . .

JUNCO: ALERT AND READY -  6 x 6 watercolour mounted on wood cradle $115

Curling is fun, exciting, stressful, disappointing, rewarding, confusing. . .    I could go on. But I think you know what I mean.  One minute you feel like a million bucks because you executed the shot of a lifetime.  The next, you are in the dumps because with a bang and boom your rock is gone.

Sounds a little like your life with a painting, eh?

Certainly it is your life when you are glazing. 

Glazing is adding a thin layer of colour over an area you have already painted.  (You can learn more on the ins and outs of glazing with watercolour starting here. )

JUNCO: PERCHED - watercolour mounted on 6 x 6 wood cradle $115

When you look at "Junco: Perched" there are several examples of where colour was glazed over colour.  The purpose, as you can see was to let the underlying colour show through while putting something else on top. Within the context of the bird those areas start with a hard edge and often finish with a soft one.  I used the blended edge described in the last post. 

However, sometimes you want to glaze over an area and you need to have soft edges all around.

WIP -  Note the orange to the left of the birds head and compare it to the finished one at the top 
No big deal.  Slap on the paint and move on. . . .

Doesn't work that way.  You paint over that an area and you will leave some pretty hard edges. Just fine if it's in the foreground.  But sharp detailed edges like that in your background wont work.  You need soft edges.
BEFORE THE GLAZE: Note the area inside the box

There is a secret weapon - Your spray bottle
Spray the area lightly that you want to glaze over.  Make it larger than the area you want to cover.  That's the easy part.  The Set Up.  Just like throwing that rock in curling.  (Using a sprayer means you are painting wet into wet without brushing on that layer of water.  This means you are not disturbing the dry layer already there.)
c
Bubbles down, time for glazing.  Note the water has not fully soaked into the paper.  Once it does the colour underneath will loosen very easily.  You don't want that. 

Now take your wet brush with your paint and paint the area you want to cover.  The beads of water on the paper should make it wet enough for your brush to slid over the area.  One Stroke.  Just like throwing the curling rock.  One slide out and release.
Putting on the glaze, don't work it.  Lay on the paint and get out.  Note how thin it is. I want my underlying colours to shine through.  That big puddles forming on the lower right side, I will dry up with a dry brush.  

If you fiddle with your brush. If you wait for the beads of water to sink into your picture before you start.  If you stroke several times - All of these things cause you to loosen the paint below and mix it with your glazing colour.  You will loose that transparent look and you may also turn everything to a variation of muddy gray.
It's Dry - note how thin it is but still it did bump up my orange area, leave the blue untouched underneath and even though there are a few edge lines from it, they are very light.  Not something that is going to draw the eye to the background.  

Yes, it is stressful. . . There is nothing you can do now but wait . . .and watch.  Just as I watch my rock, curl down the ice.  The skipper will call the sweep, to keep it in line, to speed it up or leave it alone, to glide to its spot.  I can only Watch. and Hope.  You can only watch and hope too. Once you put down that glaze you need to wait and see the results.

When the rock stops, the team evaluates.  Was it too heavy? Too light?  Did it curl more or less than expected?  Does something need to change for next time? What to do now. 

You do the same.  
When the glaze dries - Evaluate.  Was it dark enough? Do you like the new colour formed?  (Don't forget colours change when they are put on top of another colour.)  Does it need another layer? Make a plan and move forward. Repeat the steps if needed. Make changes if needed.  It is easier to add another layer than take one off.  So make those layers thin and don't worry if you do them more than once.  I often do 3 or 4 or more.  1 seldom does the trick.

JUNCO: READY TO FLY - The third Junco in my group - 6 x 6, watercolour on wood cradle
Birds are painted and I am on to new things.  Next week I am Stepping Out with an interesting new combination of mediums.  I think you are going to chuckle when you see what I'm using.


My Etsy Store is always OPEN: Etsy - WendyMouldsArt

Originals, prints and Instant Printable Cards for all Seasons available.


Coming Up Quickly

March 8-10 - The West Fine Art Show - Spring Edition

Friday, March 8, 7-9pm, Saturday March 9, 11-7pm, Sunday March 10, 11-5pm

Yorkson Creek Middle School,
20686 84 Ave, Langley     www.westart.ca
In support of the Langley School District Youth Homelessness Initiatives

It is very exciting to be part of this show, an awesome collection of some of the fine artists in Western Canada.  Our art focuses on life on the west coast but . . . oh so many different ways of seeing it.  Of course, you know I will be there with my birds and animals.  Lots of new things to share with you.  See you there. 

Artists reading this post also find the following valuable:

Is Your Sketchbook Ready for You?

 Be sure to like and share my posts.
You won't miss a single post if you Follow by Email or Like my Facebook Page.
Have a great Artful Day,

Wendy

Feb 21, 2019

Step-by-Step Glazing with Watercolour - Painting & Drawing Tips

READY TO TAKE THE PLUNGE!!

When you jump off the cliff into the cool waters below, it is a leap of faith.  Well, for sure it is the first time.  But after that . . . well now, you know how much fun it is.  So now you are running up the trail, ready to JUMP again. . . .    Super Fun.

That's how glazing feels for me. . . .


JUNCOS AT THE FEEDER - 8 x 10 watercolour on board $200

I love the subtle ways I can alter colour and value in my painting.  I love the way I can take a dark and have it thin.. soften .. disappear.   I think this must come from all my graphite work.  I love the way I can sculpture a shape with values to make it appear 3 dimensional. I know, don't get me started.  I did say I love the effect. (see last post on the What's and Why's of Glazing)

Ready to Jump In? . . . .

Here's how to Glaze from Dark to Light or also called the Blended Edge

Things to think about as you work:
1. Is your brush damp, dry or dripping wet.  I know, this is a constant for watercolourist.  I work with a paper towel in my other hand so I can always dab my brush to control the water.
2. Pigment and water runs from the wettest area to the drier area
3. Watercolour dries lighter then it looks when wet
4. Colours below must be dry before adding a layer on top
5.  Working over an area too much (fiddling) will cause the colours below to mix and you could end up with mud.  Remember, like that cliff, you jump, your Done.  Can't stop in mid air.  But . . There is always a next time.

Bend your knees, get ready to jump . . .
For the feeder post in 'Juncos at the Feeder' I want sharp edges and soft edges with my colour.  The pipe of the feeder has a dark shadow on the right side (my sharp edge).  But that shadow gets lighter as is approaches the light.  This will be my soften edge.

With a soft wet brush I apply the dark paint to the dark side of the post

Step 1 - I applied a dark wet layer of paint onto a dry layer of paint along the edge of the post.  Not too dark as I want the colour and line work underneath to show when done.

Remember, Work Quickly before your paint dries. 

Step 2  - Working VERY quickly, I'm talking quick here.. I wash my brush, dab it on my towel and touch it too the EDGE of the paint I just put down.   This must be done quickly or the paint you put down will be dry and the pigment will not move.  Your brush must be wet enough to cause the pigment to flow away from the darker area. So damp but drier than the wet paint you just put down.   If it is wetter than the painted area, the water will run into your painted area and create a backwash.  Not a pretty site and hard to fix.

New stroke goes to the edge of  your stroke in Step 2 

Step 3 - Working VERY quickly I wash my brush, dab it on my towel and touch it too the EDGE of the stroke I put down in Step 2. Yes, this is a repetition of Step 2 but starting further left, that Step 2.   Notice my brush is now a full stroke AWAY from the painted area.  For Success, Your brush must be wet enough to cause the pigment to flow away from the darker area.  Even though you are further away from the fresh painted area - If your brush is wetter than the painted area the water will run into your painted area and create a backwash.  Not a pretty site and hard to fix.

Step 4 - Quickly repeat Step 3 several more times.  Each time moving FURTHER AWAY from the dark area. Always starting at the EDGE of the last stroke.  Repeat until you are no longer drawing pigment from the darker area or in my case at the edge of the post.

Note how dry it is and how soft the blended edge is

 Once my brush stroke is running clear, I do one more stroke.  Then stop and let things dry.  If you are still drawing pigment with your stroke and you stop, the pigment dries at that edge and leaves a line. It's there for life.  With colour underneath you do not have the luxury of lifting that pigment because any scrubbing you do will lift the colours underneath.

Note how light the finished wash ended up. Way to light.   I am not concerned, I will put on several more layers when it is dries.  But I do want to see how my colour is working.  I need to decide how much value I want it to have while still letting my line work show. So I will slowly sneak up to the Value I want by glazing layer after layer.

JUNCOS AT THE FEEDER - Side View 

Final Notes: 
Go back now and look at the final picture.  You can see many places in the picture where I have used this technique - feathers on the birds, the snow shadows, the bent pipe.  The glazing on the birds might have been only 1 or 2 layers but the post and cup were more. 

Remember it is always easier to darken with another layer but like that cliff jump - once you jump, you are done!  Work up those values gradually rather than slamming them with a dark.  Be Patient. Just like the Jump - enjoy the free flying into the air, the sudden dip into the water and the excitement of scooting back up for another jump.  The Process is yours to enjoy.

 Of course, it goes without saying, practice, practice practice - getting the water right, catching just the edge and doing it in one stroke, takes practice.  But the results are worth it.

Have fun with this.  It is such a wonderful stroke you will find yourself using it everywhere in your painting when you want that dark to light, hard to soft spot.

One more post on glazing coming up - getting that all around soft edge when you glaze.  See you next week.


My Etsy Store is always OPEN: Etsy - WendyMouldsArt

Originals, prints and Instant Printable Cards for all Seasons available.

SAVE THE DATE
March 8-10 - The West Fine Art Show - Spring Edition
Friday, March 8, 7-9pm, Saturday March 9, 11-7pm, Sunday March 10, 11-5pm
Yorkson Creek Middle School,

20686 84 Ave, Langley     www.westart.ca
In support of the Langley School District Youth Homelessness Initiatives

It is very exciting to be part of this show, an awesome collection of some of the fine artists in Western Canada.  Our art focuses on life on the west coast but . . . oh so many different ways of seeing it.  Of course, you know I will be there with my birds and animals.  Lots of new things to share with you.  See you there. 

Artists reading this post also find the following valuable:

Is Your Sketchbook Ready for You?

 Be sure to like and share my posts.
You won't miss a single post if you Follow by Email or Like my Facebook Page.
Have a great Artful Day,

Wendy