Dec 2, 2022

Have Christmas Fun with Light and Shadows - Painting & Drawing Tips

Have you noticed how fast it gets DARK now?? 
I know the days are shorter but . . . REALLY . . .  
And then it SNOWED!!!   The dark is gone.  
Have you noticed????

Puppy's Can teach you lots, even how Shadows work!!


It was so pretty walking in the snow at night.  I realized there was a light glow on everything.  Here on the west coast we usually have rain.  So the evenings and often days are gray, and gloomy.  I had forgotten the glow of snow on everything.  I think the rest of Canada has this secret, that we on the west coast don't share.  

Snow = glowing light = Reflective Light 

The Power of Reflective Light is amazing.  I certainly see it as I work on my Christmas snow picture.  (I am running late this year.  I have barely started painting my Christmas Picture.  I need it to make my Christmas Cards, so I already know they are going to be a bit late this year too.)  

***Special Note: There is a video version of this blog on my Youtube channel - Playing with Light & Shadows to Put Life into your Work and a FREE Downloadable Puppy Present Reference Picture so you can draw along with me.   

  But that doesn't mean you can't have Christmas Fun !. . . .

Light and Shadows play a big part in snowy pictures, actually all your paintings.  Here's what I am talking about.  

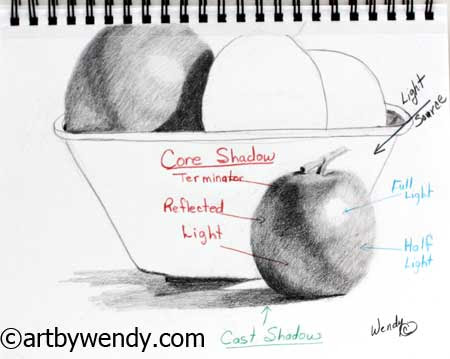
The Apple: The Story of Light and Shadows

We have all seen diagrams like this: the apple, the light source and the shadows.  

But have you ever really looked at the part Reflective Light plays? I don't just mean on the shadow patterns on the Apple but on everything around it.  When I think of Reflective Light, I see it bouncing off of everything and bringing light with it.  Sometimes it is bright, other times not.  It depends on where it is coming from. 

I imagine that crevice between the apple and the floor as a cave.  The back of the cave (crevice) is the darkest spot but as you come out to the front it gets lighter and lighter. Light is being reflected into that cave.  This happens with every crevice in your painting.  

Take the REFLECTIVE LIGHT CHALLENGE.  

1. Supplies: 2B pencil (5B optional for darker areas) kneaded eraser, Printed Picture of Puppy Present or your own outline drawing.  FREE Download of Puppy Present Here. 
 
2.  Add your own pattern to the boxes as wrapping paper. ( I used a white ribbon with a dark edge on the small box to play with its reflective light on the floor. )

3.  Draw in a line to show your Light Source. Mine is coming from the top right side (see picture above)

4.  Work on the Presents: I started with the small present and shaded it.  The front will be dark as it is in the shadow of the light but reflected light from around it keeps it from being too dark.  It will however be darker than the front of the large box as it is closer to you. 

Many Decisions to be made with Reflective Light on the Small Present


The side of the small present will be darker than the front as it is in more of a shadow area.  But again the side of the larger box will be darker, as it is further away from the light source.  Again, all are affected by the reflective light around them.  They will be darker closer to the floor as the it is the darkest area.  (Think of that crevice) 

Don't forget the glow off the lights!
This little Puppy looks ready for FUN!!


5. Now Shade in the Puppy:  This is really putting it all together.  You need to imagine the crevices formed by his ears and face.  Which will be the darkest.  Which faces the light and which doesn't.  You can see I imagined his nose protruding out enough to capture the light on one side of his face.  (A fun little challenge for me)  

6.  Try a Different Angle for the Light Source.  Take a second copy of Puppy Present and try it  backlit or having the light coming from the left side.  Which do you like best?  I felt putting the Light Source on the left side made my shadows less interesting and the shadows of the box lead the eye right out of the picture on the right side.  Do you agree? 

Have fun with my Puppy - he reminds me a lot of my own dog Max as a puppy.  Next time you paint have a look at what Reflective Light does to all of your painting.  

***Special Note: There is a video version of this blog on my Youtube channel - Playing with Light & Shadows to Put Life into your Work and a FREE Downloadable Puppy Present Reference Picture so you can draw along with me.   

COMING SOON!!!
ONLINE CLASSES WITH WENDY MOULD 
4 LESSONS on DIFFERENT WAYS INK AND WATERCOLOUR CAN PLAY TOGETHER
Email me to get on the Waiting List. Contact Wendy for More info

 Move your work to NEW LEVELS?  


1. Private Drawing Lesson: (3 Sessions 2.5 hr each $250)  North Langley, BC (Walnut Grove) 
Do you want your animals to breath, your flowers to sparkle or your people to walk?  Whatever subject your like to paint or draw I can build a drawing program for you.  Private Lessons allow you to focus on the skills you wish to develop.  Wendy is a experienced teacher, providing a calm, relaxing experience as you learn how to use the principles of drawing.  Beginner to Advanced are welcome.  Special rates for younger students.  Contact Wendy for More info

2.  Online: Teaching, Mentoring or Critiquing Your Work - Don't live in the Fraser Valley,  I would be happy to tailor a program just for you online.  Drawing and Painting Lessons, Mentoring you on your Art Journey or Critiquing Your Work with an Eye to Move It Forward.  Drawing & Painting Lessons: 2-30 sessions $75.  Mentoring or Critiquing 30 minutes sessions $25.  Flexible schedule and sessions can be longer or shorter depending on your goals. 

3.  Available at Art by Wendy's Studio
Original work, Commissions, Prints and Cards of her Work, 

Be sure to like and share my posts.  You won't miss a single post if you Follow by Email 
Have a great Artful Day,
Wendy

Nov 14, 2022

Getting the Proportions Right in Your Drawing - Painting & Drawing Tips

Do you Struggle with the Proportion of things in your Drawings?
 Aren't you jealous of those Artists that just seem to draw things so quickly?  I sure was. 
 I hated using grid lines but I really struggled with getting the proportions right.  

California Poppies - Sketchbook Practise

I worked on my drawing skills at home.  Practicing everything the books said but things did not always work out.  In those days I worked from small photographs and so I was making my picture larger than the reference.  I tried grid lines once.  I must admit they turned out not too bad but erasing all those lines was a awful job.  The surface of my paper was in terrible shape for blending with my pencils.  I guess it is ok for painting but with pencil, not so good.  After lots of drawing practice, I found out what the secret was.  . . .

Getting the Proportions right in your Drawing is really all about TRAINING YOUR EYE, brain and hand to work together. 

This little California Poppy has a great upside down cone shape for its starting point


Let me show you some of things I learned as I draw this Poppy. 
***Special Note: There is a video version of this blog on my Youtube channel - Getting the Line Drawing Right and a FREE Downloadable Reference Picture of the Poppies so you can draw along with me.   

1. Gestural Lines:  Drawing a circle will help you place the flower on your page and set the size.  But now you need some solid direction.  

Strong lines can set the drawing up


2. Strong Lines: I look for strong lines within my subject to give me a starting point.  I can see that the outside shape of the poppy is like my salad bowl - angled sides with a base.  I use gestural lines to get that shape then go back and refined them.  It is important to have the angle right for the sides.  

3.  Tighten the rendering: For many things you can fix as you move through the drawing but getting your bowl shape correct is important at this point.  Once I am happy with the angles I look at the base of the bowl shape - how big should it be?  Comparing it with the left side of the bowl, I would say approx. 2.5 times the width of the bowl base gives me the length of the left side of the bowl.  The right side of the bowl is 'a bit more'.  Using this kind of vocabulary as you draw, makes you aware of the size of things.  Compare them to the parts that are already drawn.  

Use your Reference Points to add to the drawing

4.  First Petal: Now that you have your 'bowl' drawn everything relates to it.  The first petal is drawn using the site lines I have indicated above

Each petal builds from the last one

5.  Continue draw the petals: As you move away from the starting lines they are always providing guidance.  Use site lines to determine the placement and size of each new petal.  

Use Negative Space to Refine some lines

6.  Negative Space: As you move along you will find you need to refine a line or shape.  For the front petal the overlap can be easier to draw when you look at the negative shape (the overlap) rather than the positive shape of the petals.
  
Remember that starting shape was a strong line, not the exact shape

 7.  Editing the Starting Shape: When drawing the petal on the right it is time to go outside of the starting shape.  Remember the starting shape represented a strong line, but now it is time to tighten up the rending.  Part of it goes outside the line and part of it bends around the front petal.  

Adding stems, leaves and other flowers

8.  Adding other Elements: How big is the stem? the leaves? surrounding flowers?  These decisions are based on your first flower.  When you look at the stem of your reference picture, what is a similar size?  The Stem looks to be narrower than the overlap of the two petals above.  The leaves can now be drawn basing its size on the width of the stem.  The second flower will be smaller if behind the first or larger if in front.  Start with your initial circle and shape to set up the story you want to tell.  The further back the second flower is the smaller it will be and vice versa for being in front. 
 
Adding Some shadows to bring it to life 


9. Add Values and Colour:  You can leave your drawing as a line drawing or add values and colour to it.  I like to play around so I did both.  

I have found having little conversations with myself as I draw has heighten my awareness of the relationship of each element in my drawing.  This in turn makes for a more accurate drawing, one with good proportion.  Working this way you can make your drawing bigger or smaller than your original reference and of course it really helps you draw from life.  

***Special Note: There is a video version of this blog on my Youtube channel - Getting the Line Drawing Right and a FREE Downloadable Reference Picture of the Poppies so you can draw along with me.   

Special News: 
Show and Classes coming this November to
Landmark Pop-UP Gallery, 15140 North Bluff Rd, White Rock.
  

Show: Nov 3-28, Wednesday - Sunday, 11-5pm 
Reception: Nov. 10, 6:30-8:30

Classes: Thursday, November 24 - 10-12:30pm.   Drawing with Wendy - $50 each, max 5.  

Values, Light & Shadows Bring Your Subject to Life – Thursday, Nov 24   Are your Values, Lights and Shadows making your subject full and vibrant?  Join Wendy Mould, AFCA, CDM as she breaths life into a flat, outline drawing.

 Beginners to Advanced Welcome.  Contact Wendy to Register 

 Move your work to NEW LEVELS?  


1. Private Drawing Lesson: (3 Sessions 2.5 hr each $250)  North Langley, BC (Walnut Grove) 
Do you want your animals to breath, your flowers to sparkle or your people to walk?  Whatever subject your like to paint or draw I can build a drawing program for you.  Private Lessons allow you to focus on the skills you wish to develop.  Wendy is a experienced teacher, providing a calm, relaxing experience as you learn how to use the principles of drawing.  Beginner to Advanced are welcome.  Special rates for younger students.  Contact Wendy for More info

2.  Online: Teaching, Mentoring or Critiquing Your Work - Don't live in the Fraser Valley,  I would be happy to tailor a program just for you online.  Drawing and Painting Lessons, Mentoring you on your Art Journey or Critiquing Your Work with an Eye to Move It Forward.  Drawing & Painting Lessons: 2-30 sessions $75.  Mentoring or Critiquing 30 minutes sessions $25.  Flexible schedule and sessions can be longer or shorter depending on your goals. 

3.  Available at Art by Wendy's Studio
Original work, Commissions, Prints and Cards of her Work, 

Be sure to like and share my posts.  You won't miss a single post if you Follow by Email 
Have a great Artful Day,
Wendy

Oct 24, 2022

Fall Leaves Inspire Drawing Practice - Painting and Drawing Tips

Have you enjoyed the Colours of  Fall?? 
The trees are beautiful, their reds and yellows glowing in the sunlight.  

My Pumpkin Patch - Leaves and Pumpkins Collage

But here in the Fraser Valley we have more.  The fields of blueberries glow in fuchsias and pinks as the bushes say good bye for another season.  And just this week I saw the red fields of cranberries.  The fields are flooded and the the berries are floating and ready to be scooped up.  The greens of our tall firs make an awesome background.  

I know those colourful leaves are also creating havoc in your life.  They are falling everywhere, need lots of raking, and plugging up drains.   

But don't throw all those leaves away!!

Drawing from life is an important practice to improve your drawing skills.  Leaves are a great subject, eacy to find and very low maintenance.  (They never need to stop for a coffee break) 

As Max and I walk the trails I am always on the alert for a new type of leave.  Some I will press and flatten as they dry but others I will leave to crinkle and roll.  You can get such interesting shapes if they are left on their own.  

3 Ways Leaves Inspire my Practice:
1.  Design:
As many of you know I spend a great deal of time this summer focusing on line drawing of flowers.  Of course leaves came into play.  Using leaves as a design feature to balance a drawing was an interesting part of my practice.   

Petunias and Daisies, one of my summer flower drawings

Look what happens when I remove some of those interesting little leaves I added to my imaginary flower arrangement.  

Petunias and Daisies with some of leaves removed

Really it is amazing what a few little imaginary leaves will do to this arrangement.  Playing with leaf shapes really focuses on design and composition


2.  Shape and Form: 
This particular drawing I did in early spring when the primroses started to bloom.  They were such a wonderful shot of colour when everything was still gray and dreary.  I placed the leaves around the flowers to create my own spring surprises.  Working out the complex curls and wrinkles in the leaves was not easy.  Note how some of the work was done by watercolour and some by ink drawing. 


Spring Surprises - changing my pen stroke for the different planes of the leaves teaches a lot about structure and folds

3.  Patterns:
A page of leaves floating is a very pleasing sight.  Focusing on each leaf as it sat in front of me made me aware of several drawing practices: contour drawing, fore shortening, developing curls and folds, and the differences the shading and fill patterns make.  

Floating Leaves - Love the curls of the top leaf

Adding a pattern to the leaves changes things again.  This is one leaf that I tried drawing from different angles.  

Leaf with different patterns - each one tells a different story.  My favourite one is in the middle

I have found that my practice this summer - focusing on line drawings of flowers and leaves has had many benefits for me.  I see more when I look at flowers and plants then I use too.  But most of all, I feel a greater sense of confidences in my drawing and compositional skills.  I have enjoyed creating my line drawing this summer and almost finished a whole book.  I look forward to sharing that with you soon.  

Special News: 
Show and Classes  November 3-28,
Landmark Pop-UP Gallery, 15140 North Bluff Rd, White Rock.
  

Show: Nov 3-28, Wed - Fri 11-5pm, Sat. 10-5pm & Sunday, 12-4pm 
Reception: Nov. 10, 6:30-8:30

Classes: Thursday, November 10 & 24 - 10-12:30pm.   Drawing and Watercolour  with Wendy - $50 each, max 5.  

 1: - Get that Line Drawing Right -Thursday, Nov. 10
Is your Drawing Process a Conversation between you, your subject, and your support? Join Wendy Mould, AFCA, CDM as she uses the bare line to bring her Blackeyed Susies to life.

 2 - Values, Light & Shadows Bring Your Subject to Life – Thursday, Nov 24
Are your Values, Lights and Shadows making your subject full and vibrant?  Join Wendy Mould, AFCA, CDM as she breaths life into a flat, outline drawing.

 Beginners to Advanced Welcome.  Contact Wendy to Register 

 Move your work to NEW LEVELS?  


1. Private Drawing Lesson: (3 Sessions 2.5 hr each $250)  North Langley, BC (Walnut Grove) 
Do you want your animals to breath, your flowers to sparkle or your people to walk?  Whatever subject your like to paint or draw I can build a drawing program for you.  Private Lessons allow you to focus on the skills you wish to develop.  Wendy is a experienced teacher, providing a calm, relaxing experience as you learn how to use the principles of drawing.  Beginner to Advanced are welcome.  Special rates for younger students.  Contact Wendy for More info

2.  Online: Teaching, Mentoring or Critiquing Your Work - Don't live in the Fraser Valley,  I would be happy to tailor a program just for you online.  Drawing and Painting Lessons, Mentoring you on your Art Journey or Critiquing Your Work with an Eye to Move It Forward.  Drawing & Painting Lessons: 2-30 sessions $75.  Mentoring or Critiquing 30 minutes sessions $25.  Flexible schedule and sessions can be longer or shorter depending on your goals. 

3.  Available at Art by Wendy's Studio
Original work, Commissions, Prints and Cards of her Work, 

Be sure to like and share my posts.  You won't miss a single post if you Follow by Email 
Have a great Artful Day,
Wendy

Oct 11, 2022

How to Draw White on White - Painting & Drawing Tips

How do you draw White on White? 

Is that really possible with pencils.  After all they are gray!!


LUKA - 5 x 7 Graphite Drawing. Commission 

As I was working away on my latest commission, a White Dog, I realized this presents a special  problem.  It is a problem that is not only in the black and white World of Art but colourist have to work differently as well.

White on White just doesn’t work. . .

But stop a minute. Sure the local colour of the subject is white but there are many other things to take into account. 

1.     Shadows: whether you are using colour or not, there will be shadows and they will have a value.  By Values I refer to the value scale. 

A 5 Step Value Scale - 1 Being White and 5 Being the Darkest Value

No matter what type of light is on the subject there will pure white areas (Value 1) but there will also be 
areas with subtle values (in the 1.5 to 3 range) and some with darker values (Maybe even to 5).  As the planes of the subject move further from the light they will be more shadowed.

2.    Reflected Light: This light is reflected off the surfaces around the subject.  It will not be as bright as pure light and so the subject’s surface will not be as bright and will have some value. 

Note the range of values found in the shadow side of  Luka's face

For the colourist these values also offer a potential for other colours.   Reflected light brings not only light onto the subject but it brings the colours that it is reflected from.  

Note the colours on this White Cookatoo

Although this is white bird you can in my photograph that the greens of the leaves and the reds of the branches have been reflected onto the bird.  Also note that although our eye reads this as a white bird there is in fact only a few places that are pure white.  

FULL SUN - White Flowers display many colours in the sunlight

My painting FULL SUN gives you an idea of the colours that can be infused into white flowers by Reflected Light.  

3. The Power of Suggestion: Never take this for granted. When your viewers look at your work they see what you want them to see: a white dog, a white flower, . . .  Their eye reads it as white, so the eye is ready to except that white has many values and colours in a subject.  

4.  Background Value: The value of the background has a big influence in making your subject WHITE.  Sounds a little crazy when I say it, but its true.  You can see by looking at Luka, the Cookatoo and my painting FULL SUN that the whites pop.  The reason, a background colour that is dark enough to make the white standout.  That area of strong contrast brings out the pure white.  This in turns allows for the other areas to have different values and colours.  

Next time you are working with White, check out some of these points and see how you can bring them into play in your work.  

Learn More about Reflected Light with my Video: Let Ambient Light put a Sparkle into your Work 

Special News: SAVE THE DATE
Show and Classes coming this November to
Landmark Pop-UP Gallery, 15140 North Bluff Rd, White Rock.
  

Show: Nov 3-28, Wednesday - Sunday, 11-5pm 
Reception: Nov. 10, 6:30-8:30

Classes: Thursday, November 10 & 24 - 10-12:30pm.   Drawing and Watercolour  with Wendy - $50 each, max 5.  

Part 1: - Get that Line Drawing Right -Thursday, Nov. 10
Is your Drawing Process a Conversation between you, your subject, and your support? Join Wendy Mould, AFCA, CDM as she uses the bare line to bring her Blackeyed Susies to life.

Part 2 - Values, Light & Shadows Bring Your Subject to Life – Thursday, Nov 24
Are your Values, Lights and Shadows making your subject full and vibrant?  Join Wendy Mould, AFCA, CDM as she breaths life into a flat, outline drawing.

 Beginners to Advanced Welcome.  Contact Wendy to Register 

 Move your work to NEW LEVELS?  


1. Private Drawing Lesson: (3 Sessions 2.5 hr each $250)  North Langley, BC (Walnut Grove) 
Do you want your animals to breath, your flowers to sparkle or your people to walk?  Whatever subject your like to paint or draw I can build a drawing program for you.  Private Lessons allow you to focus on the skills you wish to develop.  Wendy is a experienced teacher, providing a calm, relaxing experience as you learn how to use the principles of drawing.  Beginner to Advanced are welcome.  Special rates for younger students.  Contact Wendy for More info

2.  Online: Teaching, Mentoring or Critiquing Your Work - Don't live in the Fraser Valley,  I would be happy to tailor a program just for you online.  Drawing and Painting Lessons, Mentoring you on your Art Journey or Critiquing Your Work with an Eye to Move It Forward.  Drawing & Painting Lessons: 2-30 sessions $75.  Mentoring or Critiquing 30 minutes sessions $25.  Flexible schedule and sessions can be longer or shorter depending on your goals. 

3.  Available at Art by Wendy's Studio
Original work, Commissions, Prints and Cards of her Work, 

Be sure to like and share my posts.  You won't miss a single post if you Follow by Email 
Have a great Artful Day,
Wendy

Sep 15, 2022

3 Things Pumpkins teach you about Drawing and Painting? Painting & Drawing Tips

FALL is here!  My favourite COLOUR  Time of the year!!!!
I love the reds, oranges, and rusty browns of fall.  And I really enjoy painting with those colours. Pumpkins, Ghosts, Witches and Black Cats are not far behind.  And what awesome subjects to work with.  

Pumpkins in the Field - 4.5 x 6.6 -Drawing & Painting Pumpkins is a fun way to practice and build confidence in your work.  


But My Favourite are Pumpkins . . .

Not surprising I guess because of my colour confession.  But really, drawing and painting with the colours you love makes practicing new skills soooooooo much easier.  

What can Pumpkins teach you?

(Special Pumpkin Support:
My Youtube Video: Colour Theory: Using Pumpkins to Learn about Colour.  
Free Downloadable Pumpkin Reference Pictures here: Pumpkins are Popping Out!!)

1.  Drawing skills: Pumpkins are very user friendly, there is no perfect shape.  This means you can draw freely and confidently without your Inner Critic jumping in to comment on every mark. 

Happy Face - This little guy will give you a smile as you draw with Confidence


Your Pumpkins can be fun drawings with simple line work, realistic or cartoonish. 

Pumpkins for Sale - Practice drawing and make fun little cards for family and friends


Or more realistic: 
A few pumpkins and a few leaves and right away you have an interesting image


2. Shadows and Light: Working with a group of pumpkins you can experiment with Shadows and light. I like to try different colours in the shadows to see how they change the mood of a piece.  

The blue shadows against the white makes for a cold almost creepy sight.  

Who knew a quick colour change could create such strong, defiant images: 

The purple shadow colour really makes the pumpkins stand up and be noticed.  


3.  Designing with Colour: This is my all time favourite way to approach my pumpkins.  Playing with composition and learning more about what makes it tick.  When you pull everything into play: line work, shadows and light and colour it needs a plan.  Working small in a sketchbook you can quickly do several pieces and feel success almost instantly.  

Pumpkins on the Shelf - Putting it all together - Line Work, Shadows and Colour

I like to add a bit of foliage into my design.  The hard round shapes are a good contrast to the curvy lines of leaves.  

To take your practice further check out my Youtube Video: Colour Theory: Using Pumpkins to Learn about Colour.  
Free Downloadable Pumpkin Reference Pictures here: Pumpkins are Popping Out!!

Special News: 
Show and Classes coming this November at Landmark Pop-UP Gallery, 15140 North Bluff Rd, White Rock.  

Show: Nov 3-28, Wednesday - Sunday, 11-5pm 
Classes: Thursday, November 10 & 24 - 10-12:30pm.   Drawing and Watercolour  with Wendy - $50 each, max 5.  Content TBA.  Beginners to Advanced Welcome.  

 Move your work to NEW LEVELS?  

Contact Me for:

1. Private Drawing Lesson: (3 Sessions 2.5 hr each $250)  North Langley, BC (Walnut Grove) 
Do you want your animals to breath, your flowers to sparkle or your people to walk?  Whatever subject your like to paint or draw I can build a drawing program for you.  Private Lessons allow you to focus on the skills you wish to develop.  Wendy is a experienced teacher, providing a calm, relaxing experience as you learn how to use the principles of drawing.  Beginner to Advanced are welcome.  Special rates for younger students.  Contact Wendy for More info

2.  Online: Teaching, Mentoring or Critiquing Your Work - Don't live in the Fraser Valley,  I would be happy to tailor a program just for you online.  Drawing and Painting Lessons, Mentoring you on your Art Journey or Critiquing Your Work with an Eye to Move It Forward.  Drawing & Painting Lessons: 2-30 sessions $75.  Mentoring or Critiquing 30 minutes sessions $25.  Flexible schedule and sessions can be longer or shorter depending on your goals. 

3.  Available at Art by Wendy's Studio
Original work, Commissions, Prints and Cards of her Work, 

Be sure to like and share my posts.  You won't miss a single post if you Follow by Email 
Have a great Artful Day,
Wendy


Aug 10, 2022

Strategies for Composition - Painting & Drawing Tips

OMG!  I love those Magnolia Flowers! 
When Spring comes they are one of the first flowers to Brighten the Day.

(Special Note: Only 2 Outdoor Classes Left Aug 18 & Sept 1 - see details below ↓↓↓) 

Magnolia Flower (Photograph) 

The Magnolia flowers on my neighbour's tree and were glistening in the sunlight.  It is just a small tree.  Actually more like a bush, but Oh such a bright spot in my day. 

 Of course I had to draw it. 

I took some pictures and decided it would be a great subject for my drawing classes. Drawing and painting ‘white’ things is a really challenge. 

(Try you own hand at "Magnolia in the Sunshine" - Click for a Free Downloadable PDF )

 We decided to focus on just one bloom and really blow it up in size.  Layout and initial shading proceeded pretty quickly.  The darks are easy to find, there are hardly any.  Then the petals became the focus. 

That’s when the questions started. . . . .

 How to create the white? ? ? . . . 

A white on white paper needs a contrast to show up.  I know, it’s obvious, it needs a background.  But what should the background be?  I find this a common question from students and one that often plagues me as well. 

 This is where your personal artistic spirit comes into play.  What appeals to you?  A realistic graphically detailed setting?  An angular graphic shape?  Or are you somewhere in between. 

Magnolia in the Sunshine - Sketchbook Practice - Melissa

Melissa, my student, chose a more graphic type design of light and soft values.
  It made her flower petals pop and created drama.  It was great.


Magnolia in the Sunshine - Sketchbook Practice, Wendy 

My choice was also a graphic type design of lights and darks but it also reflected the natural environment around the flower.  (A touch of realism).  My flower pops and has great drama as well. 

 Which is right? 

 
Both are. Our drawings both look nice.  They both make you feel the power of the sun on the magnolia and our love for the topic.  They both reflect our personal touch. 

When setting up your painting/drawing you chose the subject.  You choose what to use and what to discard in the reference material.  That is your Artistic Touch.  The choices you make put your personal touch on your work.  

Magnolia in the Sunshine - Sketchbook Practice, Wendy
Fun to play around with this flower in colour too!! 

Try your own hand at "Magnolia in the Sunshine" - Click for a Free Downloadable PDF    What kind of a background will you use?  Melissa and I would love to see what you do.  

Outdoor Sketching Classes - Only 2 Sessions Left!!

Class Dates: 
Aug  18: 10-12:30pm           
Sept 1: 10-12:30pm 

Outdoor Sketching Classes are 2.5 hr sessions and located in parks in North Surrey and North Langley.  Beginners to Advanced are Welcome.  Mediums supported: watercolour, pen, pencil, watercolour pencils and coloured pencils.  You can sign up to as many sessions as you like.  Class Size: Max 3.  $50 per session.  

Arrangements made for inclement weather.  
You are welcome to contact me for help in organizing your supplies for an Outing.  

 I am available for booking special outings for you and 1-2 of your friends. 

Gift Certificates are Available     Contact Wendy to register 

Up-Coming Outdoor Sketching Events:

Aug 20 & 21 - Kilby En Plein Air Weekend - $20 - ( 2 day site fee & Sunday Elevenses) - Kilby Historic Site, Harrison Mills.  Register: kpickering@kilby.ca  See you there!!

 Move your work to NEW LEVELS?  

Contact Me for:

1. Private Drawing Lesson: (3 Sessions 2.5 hr each $250)  North Langley, BC (Walnut Grove) 
Do you want your animals to breath, your flowers to sparkle or your people to walk?  Whatever subject your like to paint or draw I can build a drawing program for you.  Private Lessons allow you to focus on the skills you wish to develop.  Wendy is a experienced teacher, providing a calm, relaxing experience as you learn how to use the principles of drawing.  Beginner to Advanced are welcome.  Special rates for younger students.  Contact Wendy for More info

2.  Online: Teaching, Mentoring or Critiquing Your Work - Don't live in the Fraser Valley,  I would be happy to tailor a program just for you online.  Drawing and Painting Lessons, Mentoring you on your Art Journey or Critiquing Your Work with an Eye to Move It Forward.  Drawing & Painting Lessons: 2-30 sessions $75.  Mentoring or Critiquing 30 minutes sessions $25.  Flexible schedule and sessions can be longer or shorter depending on your goals. 

3.  Available at Art by Wendy's Studio
Original work, Commissions, Prints and Cards of her Work, 

Be sure to like and share my posts.  You won't miss a single post if you Follow by Email 
Have a great Artful Day,
Wendy