Sep 24, 2020

IT IS TIME to get Organized for OUTDOOR SKETCHING - Painting and Drawing Tips

Did you just say "OMG, WENDY IS NUTS! It is cold wet and dreary out there.  I am not going Outdoor Sketching!!

Great Memory!! - Sketching on the Spanish Steps in Rome - May 2019


True, the great summer sketching weather is over.  Did you get out and enjoy it?  I did.  But it has taken me lots of trials and tribulations to get there.  There is more to being successful then running out the door with paper and pen in you hand.  

I would like to save you some of my frustrations . . . .

First of all, Outdoor Sketching doesn't mean you need to 'commune with nature'.  It really means you have your 'stuff' and you can sketch anywhere: restaurants, airports, street corners, living rooms, kitchen . . . .  It means you are portable, ready and not in your studio.  I live on the west coast of Canada and lots of my family live on Vancouver Island.  To get there we need to travel 1.5 -2 hr on a ferry.  I sketch the whole time.  

Awesome Memory!! Sketching at a Sidewalk cafe, Edinburgh, Scotland with my sister.  Urban sketching is just as much fun as nature sketching.  

Getting your equipment ready is a BIG priority.  Being able to grab and go is really important.  If you have to stop, find a paint brush, look for a sketchbook, get a new pen.  It just is not going to happen.  Now that summer is over you have time to put together a great little setup that will go anywhere.  I say little because that is really important.  No one wants to pack a studio with them but at the same time, you want your favourite materials with you.  After all this is about enjoying your creative process.  
 
This Backpack is a true Grab and Go Setup - Check out my video Get Ready for Outdoor Sketching to get a better look.  

A great Grab & Go setup . . 
Here is where I can really save you some frustration.  I have finally got a set up I am really loving. Light, easy to pack, great for any location and full of my favourite materials.  You can see it here on a video I prepared for the Arts Council of Surrey's Instructional Series.  I know your will find it helpful.  Video: Get Ready for Outdoor Sketching.  


 Travel Art Kit and Sketchbook are VERY small but have EVERYTHING I NEED!


A good carrying bag is very important.  It keeps stuff together, safe and easy to find.  Of course my pack breaks down to the most important elements. Your Kit.  Now my preference is to work with pencil, pen, watercolour or combinations of them.  So this is what I have in my kit.  

This is What's in the Pack - see below for the Contents


Kit Contents:  
  1. Mixed Media Sketchbook 5 in x 8 in. or close to it
  2. Very small water container (courtesy of David's Tea) 
  3. Metal Pallet: 5 in x 2.5 in folded up  These are awesome, you put your own pans in them and fill them with your own colours
  4. Brushes - to waterfilled brushes.  One empty and one full. 
  5. Business Card - never hurts to Advertise!
  6. Pencil, Pigma Perment Ink Pen 03, 05 (2 of each) kneaded eraser, small pencil sharpener
  7. Folding scissors, few coloured pens, piece of paper towel (odds and ends usually slip in there)
  8. A picture or 2 to sketch if I am in a place where nothing catches my eye. 
There is a full description of my kit in my post: My Really SMALLmendours Art Kit.  

You will want to tailor your kit to your needs.  I have seen artists that like to collage carry a small kit of papers and materials ready to go.  The most important thing is to have your Art Kit ready to go.  Dedicate the materials to just it.  Don't be using the brushes, paints, pens, materials for other projects. 

Once it is ready, take it for several TEST RUNS. . .

It is important to work with your kit to make sure you have everything you need.  It also helps to learn its little secrets.  For example: Waterfilled brushes work a little different than regular ones.  I find it is good to have a dry one, to do some dry brushing.  If it is waterfilled it is hard to do that.  I also found that the original colours I put in my palette didn't quite work.  I had one that I never seemed to use!  

It doesn't take much equipment to get Good Results - 


Once materials and equipment are ready there are other things you can focus on during the winter.  I found that when I was facing a 'large vista' I didn't know what to draw.  Practice making compositional decisions using sample pictures on-line.  Try a few and see what you like.  Another problem I had, particularly in the summer, was that everything was GREEN.  I spent time reading and experimenting with ways to break out of the green box.  


You will be surprised how much you will be looking forward to painting and sketching in other locations once you have your things organized and ready to go.  Little Adventures will be happening everywhere. 


Coming Soon - FACE-TO-FACE Gallery show!!
Artswest Showcase
October 1 - 31, 2020


Landmark Pop-Up Gallery - 15140 North Bluff Rd, White Rock

Full Covid Safety Rules in Effect - Only 6 in the Gallery at a time 

Open: Wed 10-5pm  Thur & Fri 10-8, Sat 10-5pm Sun 12-5pm

Come see what our Art Group has been doing - Lots of new Original pieces of Art, special
One-of-a-Kind Art Items and special gift items for any occasion.  

Bonus Show Activities - Semi-Private Classes:

Build your Drawing Skills with Pumpkins!!

Oct 1: Drop-In Painting Class – Doris Biddle 2-4pm
Oct 4: Fused Glass – Gunilla Kay
2-4pm
Oct 7: Acrylic Painting Class – Joanne Dennis
Oct 8: Learn Drawing Skills with Pumpkins & Ink – Wendy Mould,
Oct 14: Acrylic Painting Class – Joanne Dennis
Oct 23: Christmas Card Class – Candles & Ink - Wendy Mould,
Oct 29: Ceramics Class – Doris Biddle

All Classes 10-12:30 pm except where noted

Classes $50 each.  Some supplies included

Registration:  Contact Wendy 

Do you have big/small projects on the go?  
Looking for a sounding board, help, suggestions, techniques. You and your Inner Critic looking to expand your discussions.  I am available for Online Coaching/Teaching  (3 sessions 30 minutes each $75). more info here.   
  
Many find this post helpful: Turn your Inner Critic into your BFF
 
Be sure to like and share my posts.  You won't miss a single post if you Follow by Email 
Have a great Artful Day,

Wendy  


Sep 17, 2020

Painting Moving Water - Painting & Drawing Tips

We have twins in our family.  They are just over 28 months.  A little boy and a little girl.  So much fun to play with.  

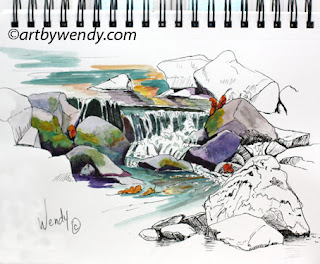
2020 Small Waterfall - It's all about painting the shapes and catching the values.  In watercolour the whites are left untouched.
2020 Small Waterfall - It's all about painting the shapes and catching the values.  In watercolour the whites are left untouched.  


They love to play with water.  Watering my plants.  Chasing Max around with the hose. Jumping and splashing in it. But the most fun of all on a cold, wet day is to saddle up to kitchen sink and 'wash dishes'.  Nothing beats pouring water from one container to another.  Watching it slip and slide along. For some reason the cascading pattern of water catches and holds us. 

Painting or drawing Moving Water is a challenge . . .

This summer for my Outdoor Sketching Classes we set up beside a small moving stream.  This allowed a really careful study of water movement.  Yes, you can take a photograph back to your studio and paint away.  But you will find that photograph does not tell the whole story.  

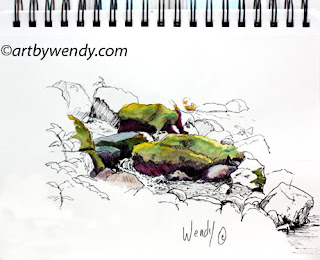
2020 Rocks and Water - Note the quiet pools next to the rocks and the faster water flowing by
2020 Rocks and Water - Note the quiet pools next to the rocks and the faster water flowing by.  


Things my students and I noted while painting moving water:

1.  The water was many colours and none of them were blue.  We were in a treed area. The water was browns, greens, golds, grays but the blues of the sky never filtered through the trees to the water below. We could even sneak reds, purples in as well.  

2.  As you work, you need to continually ask the question 'What tells me the water is moving?'  

3.  Directional lines can describe movement but also there are bubbles, ripples in the water, ripples in the shadow lines.  The directional lines should echo the movement in the water - thick and thin lines, curved lines, loopy lines, dark and light lines. 

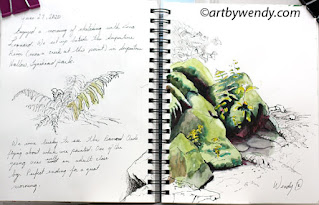
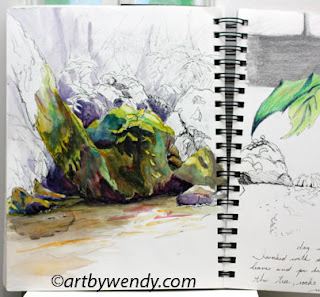
2020 Tree & Rocks - Directional lines can be many shapes and colours.
2020 Tree & Rocks - Directional lines can be many shapes and colours.  


4. There is a thin white line reflecting light at the point where a rock meets the water.  Especially when there is movement in the water.  

5. Painting water means having a value for everything except the whitest white.  This means there has to be shadows behind the white bubbles in order for them to be seen. 

6. Presenting your moving water in a setting that suggests movements helps.  In the case of my 2   waterfall studies the setting very much suggests the flow of the water.  Having leaves floating in the water reinforces this idea.  Also the contrast of little pools of still water further support the idea of moving water. 

7. Paying close attention to the edge of the rock where the water is rippling by.  This ruffled edge suggests ripples in the water.

2020 Rocks with Small Waterfalls - note the contrast between the moving water (top & middle) and the still water (bottom right)
2020 Rocks with Small Waterfalls - note the contrast between the moving water (top & middle) and the still water (bottom right) 


8.  The reflections in the water are mirror images of the surrounding area if the water is still.  But reflections that are ruffled and elongated suggest the water is moving.  The more distortion, the greater the movement. 

As our warm days slowly come to the end my scheduled classes are over.  I will head out with Max on a few more trips for a few more sketching trips.  I know your reference pictures are useful but nothing beats sitting by a small stream sketching, sunlight filtering through the trees and water trickling over the rocks.  It has a Zen Like feeling to it.  

Let me know if you would like to "Head Out" for your own Outdoor Adventure now or in the future.  I love having company.  

Check out my latest Video - Get Ready for Outdoor Sketching - Learn how to get your equipment ready for Outdoor Sketching.  Plan now and practice with it so you are ready for Adventure.  Spring will be here before you know it!!

Coming Soon - FACE-TO-FACE Gallery show!!
Artswest Showcase
October 1 - 31, 2020


Landmark Pop-Up Gallery - 15140 North Bluff Rd, White Rock
Full Covid Safety Rules in Effect - Only 6 in the Gallery at a time 

Open: Thur 10-5, Fri 10-8, Sat 10-5pm 
Come see what our Art Group has been doing - Lots of new Original pieces of Art, special One-of-a-Kind Art Items and special gift items for any occasion.  

Bonus Show Activities - Semi-Private Classes:

With Wendy:      Build Your Drawing Skills in a Fun Way
a.   Pumpkins & Ink:  Thursday, Oct 8 - 10-12:30pm 
b.  Christmas Cards with Candles & Ink , Friday Oct 23 - 10-12:30pm
Cost $50 ea  Supplies Included   Beginners to Advanced Welcome   Max 2 people  Contact Wendy to Register
   
Other Classes: Dates to be Determined. 
Beginner Acrylic;   Ceramics;    Fused Glass  

All classes will be 2 hr . Cost $50ea   Only 2 in a class!!!

Contact Wendy to get on Waiting Lists


Do you have big/small projects on the go?  
Looking for a sounding board, help, suggestions, techniques. You and your Inner Critic looking to expand your discussions.  I am available for Online Coaching/Teaching  (3 sessions 30 minutes each $75). more info here.   
  
Many find this post helpful: Turn your Inner Critic into your BFF
 
Be sure to like and share my posts.  You won't miss a single post if you Follow by Email 
Have a great Artful Day,

Wendy  


Sep 10, 2020

How to Successfully Donate Your Art -Painting & Drawing Tips

Have you ever been asked to donate your art to an event?  
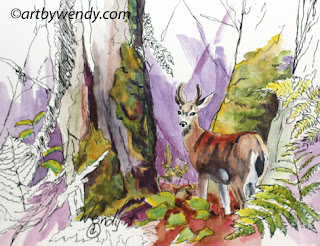
FORAGING - 8 x 10 Matted Original, $130. Ink & Watercolour


Times are different now, many organizations that depend on donations to run their programs are in tight financial straights.  Their work in the community is in grave danger of floundering and disappearing. They need help and they will reach out to you. 

 If you haven't been asked before, you will be asked soon. 

Making a successful donation of your ART to a fundraising event can open opportunities for you as well as supporting the organization.  

I see your response going through 3 different perspectives. . . .

I am very supportive of community organizations as I am sure you are as well.  I respond to the request first on an emotional level.  I know I can't support them all but I have areas where I feel very strongly: animals, children in poverty, women in need, children in my immediate community, friends in need. This is where I make my decision to donate.  At this level as well I usually decide if it will be a big or small donation.  My emotional, practical side. 
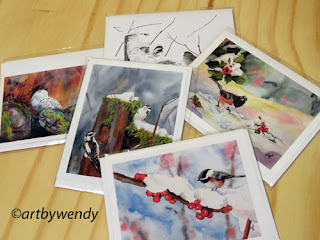
A selection of Art by Wendy Art Cards
A selection of Art by Wendy Art Cards - I try and theme the cards and chose a topic of interest to the organizations network


Once the decision is made the Artist in me kicks in.  What should my donation be? Small donations could be a set of cards, a matted or frame print, a drawing/painting lesson.  Larger donations could be a combination of small things, a 3 lesson package or original art.  I start to sort through my studio for ideas.  
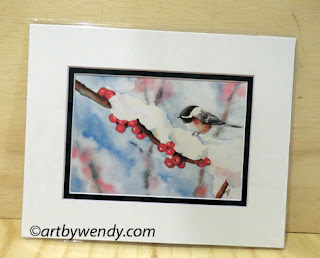
Print by Wendy Mould: Winter Berries $18
Matted Print by Wendy Mould: Winter Berries $18 - Clear Plastic Bag with Artist Bio on back


At this point the Entrepreneur comes to the forefront. The organization is asking you for a donation but in return they want to give you something: An Opportunity to Connect with their Network.  This is a very valuable opportunity to make a connection with someone new.  If this new person has bought your work in a silent auction, this is a bonus.  It means your are making a connection with someone that has not only seen your work but likes it!!

So, how do you maximize the Opportunity that your Donation brings? . . .

My piece Foraging, above, is one of the pieces from my new series Deep in the Forest.  It is a small original piece, matted 8 x 10, Retail $130.  It is going to the YWCA Silent Auction, part of the Women of Distinction Award Ceremony.(Heads up, Sneak Peek of Auction items is not open.)   From every perspective this is a good place for my donation.  As a Finalist for one of the Awards I felt it was a no-brainer.  

To Maximize a Donation of Art, you need a Donation Package. . . 

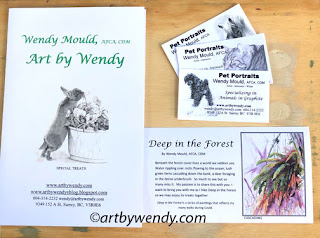
Donation Package to Accompany Art Donation by Wendy Mould
Donation Package to Accompany Art Donation for YWCA Women of Distinction Award Ceremony 

My Donation Package:
1.  An original piece of work that is high quality and will represent me well.

2.  A 4- page brochure that gives more information about myself, my process and my work. (I have this made up ahead of time and I refresh it continually depending on where my work is going.)

3.  3 Business Cards (this allows 1 to be kept and 2 to hand out.  My cards also have different pictures on them so this is an opportunity to display 3 different images.)

4.  1/3 page brochure on my new Series Deep in the Forest. (Since this piece is part of a series I am working on this is a good addition to the package.)  

Of course there are other things you could do: write-up about the particulate piece; an artist card featuring the piece; flyer of upcoming shows. Once you start thinking you will find there are many things you could add.  Try not to go into sensory overload.  There is a fine line between enough and too much.  

Don't limit this package to just donations of original work.  Donating a print or a collection of artist cards should include the same type of support material.  Each is an opportunity to display your work in a meaningful way.  

Good luck with your donations, I hope that they help your local community as well as bring a sense of satisfaction to you.  

Coming Soon - FACE-TO-FACE Gallery show!!
Artswest Showcase
October 1 - 31, 2020


Landmark Pop-Up Gallery - 15140 North Bluff Rd, White Rock
Full Covid Safety Rules in Effect - Only 6 in the Gallery at a time 

Open: Thur 10-5, Fri 10-8, Sat 10-5pm 
Come see what our Art Group has been doing - Lots of new Original pieces of Art, special One-of-a-Kind Art Items and special gift items for any occasion.  

Bonus Show Activities - Semi-Private Classes:

 Beginner to Advanced Drawing;        Beginner Acrylic;   Ceramics;    Fused Glass 

2 hr classes. Cost $50ea    Time: 10-12:30pm     Dates to be Determined. 

Contact Wendy to get on Waiting Lists


Do you have big/small projects on the go?  
Looking for a sounding board, help, suggestions, techniques. You and your Inner Critic looking to expand your discussions.  I am available for Online Coaching/Teaching  (3 sessions 30 minutes each $75). more info here.   
  
Many find this post helpful: Turn your Inner Critic into your BFF
 
Be sure to like and share my posts.  You won't miss a single post if you Follow by Email 
Have a great Artful Day,

Wendy  

Sep 3, 2020

How to Push Your Colours when you Paint - Painting & Drawing Tips

Have you ever made Chocolate Chip Cookies?  I have.  They are one of my favourite.  Chewy ones. Crunchie ones.  With oatmeal. And Without.  My favourite. 


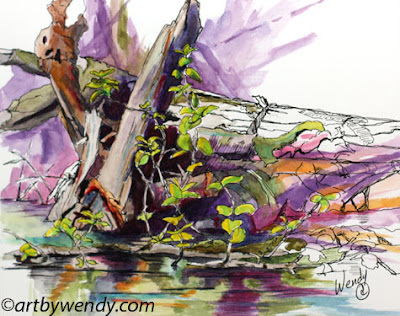
Fallen Giant - matted 11 x 14 $225 - Part of my NEW Deep In the Forest Series
FALLEN GIANT - matted 11 x 14 $225 - Part of my NEW Deep In the Forest Series

When I look at the recipes, I always have a chuckle.  Really, ½ cup of chocolate chips for a batch!!  Who are they kidding?  That is not near enough chocolate.  Now don’t get me wrong.  I do follow recipes.  I am a detailed kind of person.  But really, 1/2 cup!!

Sometimes you just have to push the limits . . .

 Painting is like that. I like realism.  I like detail. But I know sometimes realism needs help.  That was something I struggled with.  It is fine to say push colour, BUT what colour should I use?!!

Here is how I travel now on “My journey to Colour” with my Fallen Giant. . .

Please note I called this a journey.  I do not think the journey ever ends.  The more you learn and experiment with colour the more you want to try. Do. Experience.

I know you have probably tried the same stuff as me. Taken a class.  Looked at others work.  Studied books. Watched tutorials and podcasts.  They help.  But . . . .

Nothing beats just grabbing that sketchbook, heading outdoors and paint.  The immediateness of it really pushes you to experiment.  Now I am taking some of those experiments and turning them into MORE. 

My Reference Picture for Fallen Giant - Does the colour gray come to mind.  With dabs of green.  Not too exciting eh?  Composition is interesting but colourwise drab.  

1.  I mixed my black with blue and brunt sienna therefore I used the blue in the picture and brunt sienna in other ways. I also felt it gave me permission to mix  a warm or cold red and/or yellow with brunt sienna to get a few other colours.

2.  I used a green and then added individual colours from Step 1 with it.  This gave me lots of interesting greens. 

Following steps 1 & 2 keeps things coordinated, keeps the palette small and brings in new colour.  But Step 3 brings the biggest change to my work.

3.  I challenged myself to use a colour I wouldn’t normally use and really ‘couldn’t see’. This lead me to some very delightful results and some really ‘OMG can I lift that colour out NOW' moments.  This is where I feel I really begin to see new things.  (Special note, make sure you put that new colour in 3 places.  The intensity may vary but just smack it down and see what happens. Remember, it is just your sketchbook.) 

What did I learn . . .
Looking at "Fallen Giant" you can see I love my purples.  Well, no surprise there my family will say.  I love purple anyway.  But look how I play with the blue purples and red purples.  I love that.  

Log closeup from Fallen Giant
Log close up from Fallen Giant.  Note the use of "NEW COLOURS" - turquoises, pink, golden yellow


Check out that streaks of turquoises, pink, golden yellow on the log.  It seems to add life and colour and cohesion to my work.  It looks happy there. Yet, there was none of those colours anywhere in the reference.  They were my 'challenge colours' from Step 3.  I liked them so much I incorporated them in other places.  They might be different values but the colour is still there. 

Water closeup from Fallen Giant
Water closeup from Fallen Giant.  Note the dark water close to the logs, as per reference but it changes and employs more colours as it moves away from the logs

Check out the water reflection.  I know I took a bit of poetic license there.  I just couldn't leave it so dark and black.  The colours seems to draw the eye into the picture and accepts that other colours could be there.  

Okay, you might have a bit of problem with too much colour and not enough realism but that becomes the personal touch of the Artist's interpretation.  My thirst for realism is met with my very realistic ink drawing and the colourfulness of the piece excites me.  You may not want so much.  If so,  challenge yourself with only 1 'out of the box colours' and move forward.  Trying this will get you moving and you will find your own taste.  (I deliberately did not give proper names to my colours as again, using your palette, whatever green, blue, yellow, reds you use will reflect your style.) 

Some found the following helpful:
Have you Felt the Power of the Line: Activity playing two or 3 colours against each other in a drawing activity.  Blog with Video support. 

Things You NEVER Knew about Your Blues: Looking at your Blues and how they work in your painting. 

Putting Sparkle in Your Colours: Looking a Visual Complements instead of Mixing Complements and how that can change your colour choices.  

Catch Wild n Free 
A Virtual Show by Wendy Mould - Held over till Sept 10.  

Invitation to Wild n Free Virtual Gallery Show by Wendy Mould
Show includes Video Introduction by Artist - See show here 

SHOW BONUS:  Blog: How to Stage a Virtual Art Show 

 Do you have big/small projects on the go?  
Looking for a sounding board, help, suggestions, techniques. You and your Inner Critic looking to expand your discussions.  I am available for Online Coaching/Teaching  (3 sessions 30 minutes each $75). more info here.   
  
Many find this post helpful: Turn your Inner Critic into your BFF
 
Be sure to like and share my posts.  You won't miss a single post if you Follow by Email 
Have a great Artful Day,

Wendy