Showing posts sorted by relevance for query visual complements. Sort by date Show all posts

Jan 17, 2019

Putting Sparkle into Your Colours - Painting & Drawing Tips


Planning Finished. . . .       Decisions Made. . . .    Ready to begin.  . .   
Flushed with excitement I started mixing paint, I was confident success would be mine.  Do you feel that way with each new project? Engulfed in that glow of inspiration, the goal shining over you.

Then suddenly at some point in the process it dims. . . . . 


Petunias & Hummingbird - 14 x 11, matted unframed $225 
That's what happened to me.
I know, you are saying but look, there is your nice picture, and it looks great.  BTW, thanks for those thoughts, I glad you like it.  In the end I am happy too but there was a moment in the process when I was very unhappy.  

Cropped Picture: WIP  Note the lack of sparkle in my petunias

My pretty pink petunias did not have a sparkle.  I had painted my hummingbird, some leaves and decided to try one of the flowers.  I tried shadowing with a red purple.  I used my compliment of permanent rose to gray it and make the petals bend.  I even tried a bit of red to bend the petals. Yes, they are bending but no sparkle.  Not looking good. I didn't panic, I fiddle more with leaves and their shadows thinking the neigbouring colours needed some work.

Still no sparkle . . .
In a last effort for success,  I lifted some colour to get a brighter highlight. (at the same time knowing I didn't want it so bright)  It helped but still not there.  Disappointing. Time for RESEARCH!!!

I found some helpful info . . .
I know this may not be profound for you and I am sure I have heard it many times but this time it resonated with me. There is the Mixing Complement of a colour, this is one we all know.  Mixing Green with Red, its complement, neutralizes the colours and results in a black or dark gray. Other examples of mixing compliments are yellow/purple and orange/blue.  I thought about them all the time as I worked on my picture.  

However, my pinks weren't happy.  Nor was I.  

As I read further, I began to understand there were Visual Complements.  A Visual Complement  enhances the colour.  They make a pair of colours more vibrant when they are painted together. When they are mixed together they will produce a colourless gray.   Now you have new pairs to think of.  These are Visual complements like red/turquoise, cyan/orange, yellow/blue.  This mean that my pink needed a more turquoisey colour, Winsor Green.  I found Hilary Page's Explanation really spoke to me and the light finally came on.  I know this is something I will have to work with more but for now I jumped on it.  Note the change in my final picture with the cropped one.  My greens are definitely different.   (See Hilary's Article here)

Note the Yellow with its Mixing Complement Purple and with its Visual Complement Blue.  Quite a difference, eh?! The yellow really sparkles more with the blue. 
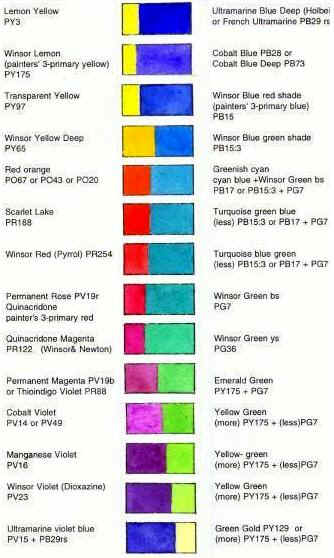
Hilary has put together a visual chart showing how the Visual Complements look together. I have included it here for you to get a feel of what it is about.  I can see even on the chart that there is a real sparkle between the colour pairs.  

A Visual Complements Charts by Hilary Page 

Visual Complements in Action . . .
I was very much reminded of these visual colour complements in action when I attended Guo Pei Show at the Vancouver Art Gallery this week.  Her fashion show for MAC Cosmetics was Sparkling.  (of course her use of colour was only one reason for the sparkle)  It had a Garden theme, her yellows and blues weaved through the clothing certainly played a roll in making everything sparkle. 

Note the bright blues and yellows connecting the pieces
Her style is distinctive but her purpose was to capture you, to make you feel excitement in the product, its sparkle: fresh, clean, bright, new, exciting, and much more. 

Don't you just love it. 
She definitely caught my eye with her fashion.  I know, nothing I would ever wear but ooooo. . . so interesting.  
Art in a different form but still very much Art. 

It was exciting to see how she used the same kind techniques I use in my paintings to draw attention to my subject.  But seeing the visual complements in action was a definite "A..ha Moment" for me.  

This post is a follow up post to my previous one: "Make Those Pictures Count" .  See it to read more on the planning progress of this painting.  

Next up: Build a Background, from abstract to realism. 

My Etsy Store is always OPEN: Etsy - WendyMouldsArt

Originals, prints and Instant Printable Cards for all Seasons available. Special Note:  Instant Digital Valentine Cards are now Ready - Print, Fold and Give.  They are great for Pet Lovers, featuring Cats and Dogs - of course Max was my inspiration for the dog drawing!

Special Opportunity Coming Up:
Marketing Workshop - Let's Get Your Art Out There!!  
Sunday, Feb 24, 2019  10-3pm with Wendy Mould, AFCA

Need a focus for your Marketing Strategy?  Unsure where to start, where to head next? Marketing takes so much of your time away from the Studio, learn where to focus your energy and ways to maximize your time.  At the end of the day you will have plans and be ready for Action. 
 Cost $84 Tx Incl  

Working with Wildlife Artist Wendy Mould, AFCA bridges the gap between the Entrepreneur and the Artist in the Marketing World.  Contact Wendy to Register. 


Artists reading this post also find the following valuable:
Matching Colours to Values here
Playing with a Very Limited Watercolour Palette here
3 Ways to Turn Drawing Despair into Action here
How to Find your Starting Point here

 Be sure to like and share my posts.
You won't miss a single post if you Follow by Email or Like my Facebook Page.
Have a great Artful Day,

Wendy


May 20, 2021

Did you Nail the Darks in Your Painting?- Painting & Drawing Tips

Are you busy preparing your flower garden for the summer?
Thinking about shade and sunlight; perennials and annuals; blues or reds; levels of upkeep; length of bloom.  So much to consider.  

ROCKY ROAD IN THE CREEK BED - WIP - layout drawing with study 

I must admit, some years I get so caught up in the choices I end up with a hodge-podge. Each plant on its own looks great, but when I stand back. . .  Well let's just say it is a mass of colour but no real focal point.   Or there is a focal point, but it is lost in the mix.  

I know all about that, loosing a Focal Point is easy to do!!

How do you lose a Focal Point?  Yes, it is possible.  A Focal Point, is the highest contrasting area.  A place where your lightest light meets your darkest dark.  On a Value Scale that would be your Darkest Dark, a 10 meets your Lightest Light, a 1.  


You would think that working with black permenant ink, like I do, that setting up a strong Focal Point would be easy.  But it's not.

Drawing the layout for Rocky Road in the Creek Bed with my pen, means there is lots of sharp contrast, black lines with white paper. Each time my pen touches the paper, it seems soooooo dark. When I do a bit of cross hatching or restate a line, it is reallllllly dark.  It's like OMG! I think I over did in that spot. I really have to steal myself to not react that way.    

Close Up of  Drawing Layout - Lots of really sharp darks in this area 

Take for example this close up area in my layout Drawing of Rocky Road in the Creek Bed.  It looks quite dark when working/looking at it.  However, when you stand back and look at the whole picture that is not the case.  It settles into the picture and really doesn't draw the eye too much.  Which is a good thing.  That wasn't suppose to be my focal point, just an interesting place in the picture.  (Side note, still it is darker than it should be but I don't panic.  I know with my watercolour I can settle it in.)

So stand back . . . .   

Look at your painting. . . .  

Does the Focal Point catch your eye. . .

Or does it blend in? . . .   Is it lost??

If it's lost, don't despair.  There are ways to deal with it.  If you are dealing with pencil or pen, like I often am, you can go in and darken an area and lighten another.  If you are dealing with colour consider the value of the colours you used.  Looking at this chart you can see that some colours (hues) have darker values than others. So chose a different hue.  Or note that changing the tone can change the value.  Another option. 

Notice how colours have a value in a similar manner as the grayscale on the left


Another way to bring your Focal Point back into view is to look at the Visual Complements of a colour.  This is different from the regular complements of a colour that we usually talk about.  I find this a very interesting phenomena and certainly useful.   Take for example the Yellow on the chart.  You know that purple is its complement and will gray it down.  But look how the Cobalt Blue really pops it on the chart below.  

Visual Complements that will make your Focal Point Pop 

Not confident that your Focal Point is there?  Take a picture of your piece and change it to grayscales in a photo editing program. It is often easier to see when colour is not in the mix.  These tools are useful in your tool kit to make the fix you want. 

For more information see:
Getting Values Working for You 

Wendy is on Youtube:
Wendy has FREE Tips & Techniques on Video now, many with supporting blog posts and FREE download PDF's.  
See a full linked listing here - artbywendy.com - workshop - Videos by Wendy

OUTDOOR SKETCHING SEASON  is HERE!!

Next Sessions:  Saturday, May 22 (Forecast Sunny & 20°) 
Wednesday, May 26
10am - 12:30pm 

Upcoming Dates: Wednesday  June 2 & June 9
Saturday, May 22,  June 5 & June 12 

Twice a week, Wednesday and Saturday mornings, I will take small groups out for Outdoor Sketching.  Get Tips and Techniques for Sketching in Nature.  Beginners to Advanced Welcome. Max. 3 per class. (Other times available upon request) 

Mediums supported: pencil, pen, watercolour, watercolour pencils and coloured pencils 
Location: Parks in North Surrey and Langley
Cost: $50 per session

Supplies: Bring your own supplies, don't hesitate to contact me about your supplies
Rainy Days: Not fun to plein air in the rain.  You can defer to another available day or join me in my studio and work with me. (when Covid rules allow small inside gatherings) 

Contact Wendy to Book Your Spot!! 

Looking to Move your work to NEW LEVELS?  

  Online Coaching/Teaching  (3 sessions 30 minutes each $75)

Are You and Your Inner Critic looking to expand your discussions.  Here's how it works: Send me a few pictures of your paintings.  I will prepare material to facilitate a discussion based on your goals.  I am a sounding board, coach and teacher,  with suggestions, techniques and tips to help you meet your goals and move your art forward.  More info here.   Looking forward to Zooming with you.  
  
Many find this post helpful: Turn your Inner Critic into your BFF

Be sure to like and share my posts.  You won't miss a single post if you Follow by Email 
Have a great Artful Day,
Wendy


Mar 14, 2019

Experimenting with Oil Stiks - Painting and Drawing Tips

Welcome to my Playground 

SPRING is close at hand - time to try some new things! 

Trying my hand at Oil Stiks - their stiks so why no try drawing  
I had the opportunity to try using Oil Stiks, I jumped at the chance.  I had this great idea that since they were Stiks it must be like drawing.  I figured I could do that, Right!?

What are Oil Stiks? . .
If you are like me, you have never heard of them before.  Oil Stiks are oil pigment in a stik form.  They are about 3/4 inch (1.9 cm. ) in diameter.  Basically a very fat pencil.  They have a bit of a film over the surface which needs to be scraped off.  Then they are ready to paint/draw with.

My First attempts . . .
Okay, I know, wont win any prizes with this picture.  I started out trying them on heavy cardstock to see what they can do.  They are creaming and can be used like a pencil.  A bit like using a brush and like a brush it takes time to cover the surface.
Definitely need to learn more to succeed with these stiks!!
A big problem . . .
Like all painting processes you can create mud very easily.  Strokes have to be kept separated as they will mix with the adjacent colour or the colour underneath. Not a happy thought eh?  Needless to say, I became very good at making mud, very quickly.  In all fairness though, using heavy paper was not a good idea.  The paint was slick and moved around too easily.  Things got much better when I moved to a gesso panel.

Working on a Gesso Panel - note the size of  the stik 
Finding the Right Colour . . .
Just like coloured pencils and pastels a small kit of colours is not enough.  They come in sets but you will always be wishing for another colour, another stik.  Yes, you can mix colours but there is a limit to what can be done.  Remember the Mud.

Note all bad, once colour is down there is FUN to be had
There is FUN to be had here . . .
I know, you are thinking this is not a happy place right now.  And I must admit when I started I thought, what am I doing?  However, I found the HAPPY PLACE.  The reason artist reach for these stiks.  It is the scrapers.  Once the colour is down, you can scrape paint away to make all kinds of patterns and lines.  Definitely a FUN place to be.  Note the awesome scraper in my hand, pictured above.  This is a silicon scraper and great to work with.

Note some of the scrapers on the table
Other fun tools . . .
In the picture above you can see some different scrapers. Some are special art tools but others can be a spatula or icing tools.  Certainly those made out of silicon are the best to use and easiest to clean.  Dollar Store, here I come.

Not a Masterpiece but certainly an improvement over the first attempt
My Take Aways  . . .
*Working with the stiks was very interesting.  I found as you can see, I really like that dark shadow line.  I guess I am influenced by my love of my ink drawings.
*The scrapers really let you move the colour around and off so you can get lights and darks with the same colour.  Note the purple background and high lights on the mushrooms
*The scrapers allow for different types of brush strokes.  The stik smear the paint on but the scrapers can create ridges and hollows
*Drying time is very much like a true oil, tacky for up to a week and up to 6 months before you varnish.  Especially if you have thick areas. 
*Working with the oil forcing you to learn more about your colour mixing as "Mud" can appear very quickly.  Definitely time to look at working with Mixing Complements and Visual Complements

I really enjoyed playing with the stiks and trying them out.  Will I continue with them, no.  I have my hands full with what I work with now.  But did I enjoy the experience - Totally.
A special thanks to Joanne Dennis and Melissa Burgher for the Introduction to Oil Stiks. 

Have you tried "the stiks"?  What are your thoughts?

On the easel now is "Buddy" a very good looking cat. (Him now with his baby picture in the background)  Next Post - Drawing Buddy - a Silver Gray Cat. 

My Etsy Store is always OPEN: Etsy - WendyMouldsArt

Originals, prints and Instant Printable Cards for all Seasons available.

Time to Register

May 1 - Workshop Day for Spring Show - South Burnaby

Want to experience the joy of watercolour?  Learn about the supplies? See paint in action as you create your first Masterpiece?  Join Audrey and Myself on May 1, 10-12pm for a Beginner Watercolour Class - $40 all supplies incld. 

Itching to create but want some direction? Want to make exciting cards and notes for the special people in your life? Add design to your sketchbooks and journals? Join Myself and Audrey on May 1, 1-3pm for a Creative Card Class - $40 all supplies incld.  This year's theme: Flowers and Ladybugs.  

Audrey Bakewell and Myself include this Workshop Day as part of our Spring and Fall Shows at Mandeville Gardens, 4746 Marine Dr, Burnaby.  Both classes are very popular and fill up very quickly.  

SPRING SHOW:     Paints'n Bloom Workshops & Art Show & Sale
 in Support of the Alzheimer's Society of BC

 Thursday, May 2  to Saturday,  May 4 

Gardenworks at Mandeville Gardens, 4746 Marine Dr, Burnaby


W
orkshop Day: Wednesday, May 1 

10-12pm - Beginner Watercolour Class

1-3pm Spring Card Making Class

$40 ea. All supplies incl. Beginner to Advanced Welcome

Registration Happening Now Contact Wendy 

 Be sure to like and share my posts.
You won't miss a single post if you Follow by Email or Like my Facebook Page.
Have a great Artful Day,

Wendy

Feb 14, 2019

Using Glazes to Finish the Background - Painting and Drawing Tips

Do you play the slot machines?  

Drop in the money, pull the handle, Bing! Bang! Boom! you win or lose.  You're Done! No second chance, everything happens in that one pull.

Golden Finch & Apple Blossoms - 10 x 8 watercolour on wood cradle $200 
Of course you are going to tell me that you can always pull again. But, that is with new money.  Things are different.  

Glazing with watercolour is just like your Slot Machine . . .
You only get one chance.  One pull with the brush, then you have to leave it.  That is the hardest thing because believe me.  It. Is. So. Easy. To. Fiddle.  You know what I mean.  Run over it again with the brush.  Dab a bit.  You know, Fiddle.  

What is glazing with watercolour?
Glazing is putting an overlay of watercolour onto colour that is already dry on the paper.  Thus allowing the colour underneath to show through.  

Why would you want to glaze over a colour?
There are many reasons:
1. to adjust the value by making the area darker
2. to modify the colour of an area
3. to give richness to an area as both the top colour and the colour underneath will show. 
4. to build on the illusion of depth (very useful in backgrounds)

Things to think about as you glaze
1.  The painted surface must be dry and paint set so you do not mix it into the new layer you are adding.  If you do, you lose that transparency look you're looking for. And worst you might end up with mud.
2.  To get a true transparent look you need to use transparent watercolours.
3.  Your glazing layer should be thin to keep it transparent so you will be doing multiple layers. Each layer must be dry before adding the next layer.  (see note #1)  Check for dryness by touching paper, if cool it is still wet.  I generally use 3 or 4 layers but some places may take more. 
4. Use soft brushes as a stiff brush many lift colour and leave brush lines
5.  The colour layer you are adding will change the colour layer underneath so you may want to have a test sheet handy to see what will happen. 
6. Watercolour dries lighter than it looks when applied. 

Want to see what glazing can do? . . .
Below is my Golden Finch & Apple Blossoms.  At the left is my picture at the starting point. I used frisket to protect my mid-ground and foreground areas as I applied the background wash.  (see post of Saving Whites )  I then removed the frisket and painted the mid-ground and foreground.  This is where the glazing happened as I made changes to the background.  In some areas I wanted to darken it alot, as you can see with the leafy area in the bottom right hand corner. That took several layers.  Can't say how many as I lost count.  I just kept letting it dry, checking the value and adding more.  

Not the difference in the background areas when I made adjustments with glazes.  
In other areas I added only a light glaze.  Note the suggested flowers in the background.  One is just to the left of the bird.  Those suggested blooms did not look like they were in the distance, they were too bright.  A thin glaze of purple set them back.  

Glazes can make a Big Change  . . 
There were two areas where I made the big changes in my picture.  One was the areas glazed with Winsor Blue - Green Shade (WB).  That was not one of my original colours.  I was just going to use Ultramarine however, I found that did not add enough zip to my picture.  (Remember that post last month on Visual Complements)  I tried glazing with a bit of WB and really liked how my yellow started to sparkle.  You can see in the picture how much it not only darkened but added life to the greens.  

The other change was in the bottom left corner where I used Permanent Rose as a glaze.  Here I created a leaf shadow.  I left the edge a bit rough to really make it 'leaf like'.  This seemed to subtly add another layer to my background. I really liked that. 

Interested in playing with glazes a bit more? 
Next post is glazing with hard and soft edges - step by step.  Are you a glazer too?  I love the mix of glazing and opaque colour to create my wildlife paintings.  

This little paint is a watercolour painting which I have mounted on a wood cradle .  Here is a side view.  (To see mounting watercolour paper on a wood cradle and paint techniques )

GOLDEN FINCH & APPLE BLOSSOMS - 10 X 8 inch watercolour on wood cradle $200

My Etsy Store is always OPEN: Etsy - WendyMouldsArt

Originals, prints and Instant Printable Cards for all Seasons available.

Special Opportunity Coming Up:    1 Spot Left
Marketing Workshop - Let's Get Your Art Out There!!  
Sunday, Feb 24, 2019  10-3pm with Wendy Mould, AFCA

Need a focus for your Marketing Strategy?  Unsure where to start, where to head next? Marketing takes so much of your time away from the Studio, learn where to focus your energy and ways to maximize your time.  At the end of the day you will have plans and be ready for Action. 
 Cost $84 Tx Incl  

Working with Wildlife Artist Wendy Mould, AFCA bridges the gap between the Entrepreneur and the Artist in the Marketing World.  Contact Wendy to Register. 


Artists reading this post also find the following valuable:
Matching Colours to Values here
Playing with a Very Limited Watercolour Palette here
3 Ways to Turn Drawing Despair into Action here
How to Find your Starting Point here

 Be sure to like and share my posts.
You won't miss a single post if you Follow by Email or Like my Facebook Page.
Have a great Artful Day,

Wendy

Sep 3, 2020

How to Push Your Colours when you Paint - Painting & Drawing Tips

Have you ever made Chocolate Chip Cookies?  I have.  They are one of my favourite.  Chewy ones. Crunchie ones.  With oatmeal. And Without.  My favourite. 


Fallen Giant - matted 11 x 14 $225 - Part of my NEW Deep In the Forest Series
FALLEN GIANT - matted 11 x 14 $225 - Part of my NEW Deep In the Forest Series

When I look at the recipes, I always have a chuckle.  Really, ½ cup of chocolate chips for a batch!!  Who are they kidding?  That is not near enough chocolate.  Now don’t get me wrong.  I do follow recipes.  I am a detailed kind of person.  But really, 1/2 cup!!

Sometimes you just have to push the limits . . .

 Painting is like that. I like realism.  I like detail. But I know sometimes realism needs help.  That was something I struggled with.  It is fine to say push colour, BUT what colour should I use?!!

Here is how I travel now on “My journey to Colour” with my Fallen Giant. . .

Please note I called this a journey.  I do not think the journey ever ends.  The more you learn and experiment with colour the more you want to try. Do. Experience.

I know you have probably tried the same stuff as me. Taken a class.  Looked at others work.  Studied books. Watched tutorials and podcasts.  They help.  But . . . .

Nothing beats just grabbing that sketchbook, heading outdoors and paint.  The immediateness of it really pushes you to experiment.  Now I am taking some of those experiments and turning them into MORE. 

My Reference Picture for Fallen Giant - Does the colour gray come to mind.  With dabs of green.  Not too exciting eh?  Composition is interesting but colourwise drab.  

1.  I mixed my black with blue and brunt sienna therefore I used the blue in the picture and brunt sienna in other ways. I also felt it gave me permission to mix  a warm or cold red and/or yellow with brunt sienna to get a few other colours.

2.  I used a green and then added individual colours from Step 1 with it.  This gave me lots of interesting greens. 

Following steps 1 & 2 keeps things coordinated, keeps the palette small and brings in new colour.  But Step 3 brings the biggest change to my work.

3.  I challenged myself to use a colour I wouldn’t normally use and really ‘couldn’t see’. This lead me to some very delightful results and some really ‘OMG can I lift that colour out NOW' moments.  This is where I feel I really begin to see new things.  (Special note, make sure you put that new colour in 3 places.  The intensity may vary but just smack it down and see what happens. Remember, it is just your sketchbook.) 

What did I learn . . .
Looking at "Fallen Giant" you can see I love my purples.  Well, no surprise there my family will say.  I love purple anyway.  But look how I play with the blue purples and red purples.  I love that.  

Log closeup from Fallen Giant
Log close up from Fallen Giant.  Note the use of "NEW COLOURS" - turquoises, pink, golden yellow


Check out that streaks of turquoises, pink, golden yellow on the log.  It seems to add life and colour and cohesion to my work.  It looks happy there. Yet, there was none of those colours anywhere in the reference.  They were my 'challenge colours' from Step 3.  I liked them so much I incorporated them in other places.  They might be different values but the colour is still there. 

Water closeup from Fallen Giant
Water closeup from Fallen Giant.  Note the dark water close to the logs, as per reference but it changes and employs more colours as it moves away from the logs

Check out the water reflection.  I know I took a bit of poetic license there.  I just couldn't leave it so dark and black.  The colours seems to draw the eye into the picture and accepts that other colours could be there.  

Okay, you might have a bit of problem with too much colour and not enough realism but that becomes the personal touch of the Artist's interpretation.  My thirst for realism is met with my very realistic ink drawing and the colourfulness of the piece excites me.  You may not want so much.  If so,  challenge yourself with only 1 'out of the box colours' and move forward.  Trying this will get you moving and you will find your own taste.  (I deliberately did not give proper names to my colours as again, using your palette, whatever green, blue, yellow, reds you use will reflect your style.) 

Some found the following helpful:
Have you Felt the Power of the Line: Activity playing two or 3 colours against each other in a drawing activity.  Blog with Video support. 

Things You NEVER Knew about Your Blues: Looking at your Blues and how they work in your painting. 

Putting Sparkle in Your Colours: Looking a Visual Complements instead of Mixing Complements and how that can change your colour choices.  

Catch Wild n Free 
A Virtual Show by Wendy Mould - Held over till Sept 10.  

Invitation to Wild n Free Virtual Gallery Show by Wendy Mould
Show includes Video Introduction by Artist - See show here 

SHOW BONUS:  Blog: How to Stage a Virtual Art Show 

 Do you have big/small projects on the go?  
Looking for a sounding board, help, suggestions, techniques. You and your Inner Critic looking to expand your discussions.  I am available for Online Coaching/Teaching  (3 sessions 30 minutes each $75). more info here.   
  
Many find this post helpful: Turn your Inner Critic into your BFF
 
Be sure to like and share my posts.  You won't miss a single post if you Follow by Email 
Have a great Artful Day,

Wendy  

Dec 13, 2019

Things You NEVER knew about Your BLUES - Painting & Drawing Tips

Do You Play with Your Colours?   Make Test Swatches?
But
When you are in the Trenches, Things fall apart?
Doesn't that just kill you?..


BOAT BUDDIES - Sketchbook Work


You're Ready: Ideas, materials, time.  You're in the zone.  The creative juices are flowing.  Paint is flying, brushes are swooping and Life is good.  

Suddenly everything falls flat. . . .

The Colour is not Right. 

What to do. 

Fear not.  We have all been there.  

No, I don't have a magic wand that can make it all better for you.  I sure wish I did.  In fact I really don't know any quick way to solve your problem.  I do have some practices that may help.  And as your probably guessed, it involves your Best Friend.  She is probably languishing on a shelf because it is winter time and your are not taking her out for a spin.  Who is that, you ask?  Your Sketchbook. 

I use my sketchbooks year round.  On the warm days I will paint from life but other times I just head to my photos on my Ipad and find a picture.  And yes.  I use my small travel paint kit instead of my larger studio set up.  

Why paint picture in my Sketchbook? What has all this got to do with Learning About my Blues?
Painting test Swatches certainly tell you about mixing your blues and all the different colours you can make with your blues.  But that is not the whole story.  

Test Swatches tell you lots about the colours you can mix with just 2 or 3 pigments

Test Swatches tell you what colours you can mix but they don't tell you how they will work within the framework of your picture.  For example, if you want something to shine and sparkle which blue should you use.  Cobalt Blue. Winsor Blue. Ultramarine. Tourquois. Are only a few of your choices.  

A Mixing Complement will tone it down, a Visual Complement brings the sparkle. Seeing your colours in action gives that important information.  (See Post Putting Sparkle into your Colours for more on these two kinds of complements.)

Painting in my sketchbook means to me a small quick study focusing on my own personal challenge.  Here I am freer with my colour choices.  It seems so much easier to experiment.  To just jump in and give it a whirl.  Not sure why but it does.  

BOAT BUDDIES WIP - This is a gray aluminum boat with no other colours. I wanted to paint it because he has such a sad look.  No swagger like the speed boat beside him.  I needed to push colours a bit so decided to warm it up with a bit of yellow. 

BOAT BUDDIES - Close Up, Before and After - 
In my sketch Boat Buddies - I played just with my Blues in my small travel kit: Ultramarine, Winsor Blue Green Shade and Cobalt Teal Blue.  I used my Burnt Sienna with the Winsor blue to get that greenie blue colour in the water and on the side of the boat.  And New Gamboge for the yellow. I played around with my blues to see how/what I could do. This playing about showed me many things about my blues that I would not have learned otherwise.

Interesting things I noted:
1.  Adding the yellow as a glaze on the side of the boat then glazing my dark colour over it.  Resulted in making a warm light reflection in the dark shadow areas.

2.  Using the Cobalt Teal Blue on the sunny areas and Ultramarine inside the cabin gave a nice warm cool mix.  

3.  When I first put the yellow on I felt like "Oh, Oh"  That might not have been such a good idea.  But I charged on.  Once I glazed over the yellows with my other colours it worked out just fine.  And in fact did warm things up in the shadow area and cool it down in the sunny area.  It also made the colours more interesting.  Colourful. Not just plain gray blue.

4. I mixed the Brunt Sienna with Ultramarine and Winsor Blue. Very interesting to see the different results and to play them beside each other.  Note the wharf darks and the boat darks where they meet. 

5.  Glazed with Ultramarine over the light areas around 'the eyes' to darken the shadow side.  The light side and dark side needed to be different values but similar colours.  I liked how it 'did the job'. 

Each time I work on these little vignettes in my sketchbook I come away with new thoughts and ideas.  Playing and learning about the Blues in my kit was just one of the outcomes for BOAT BUDDIES.  

How do you practice with your colours?  What works for you?  

Looking to move your Drawing Skills to the Next Level?

Book a 3 Pack of Private Lessons with Me - 3 Lessons 2.5 hr each $225
Drawing/Painting lessons in graphite, ink, watercolour, watercolour pencils or coloured pencils Or any combination of these.
Flexible Schedule, at my Studio/Gallery, N. Surrey. 
Gift Certificates Available 


February is Marketing Month for Artists!!

Each February I offer an all day workshops “Let’s Get Your Art Out There!!”
2020 Date: February 23, 10-3pm
Having trouble getting started or knowing where and what to do?
This workshop gets your Marketing Plans fired up to new and more successful levels. Learn the basics of today’s Marketing World, learn how to develop markets both online with Social Media and off line in your community, learn how to develop a productive network, and set up a Marketing Plan that will work for you. Taking this workshop is a valuable step in moving your business forward. Workshop runs 10-3:00 pm with a lunch break.    Class limited to 8 people
Cost $90 Tax Incl      Pre-Registration Required, contact Wendy      Gift Certificates Available


Save the Date . . . . . 

January 18, 2020 - Opus Langley Demo:  Put WOW! into Your Mark Making with Wendy Mould, AFCA, CDM  11-12:30pm and 2-3:30pm.  Free but must Register: (604) 533-0601

See you there!!


My Etsy Store is always OPEN: Etsy - WendyMouldsArt

Originals, Prints, Commission Work and Instant Printable Cards for all Seasons available.

Be sure to like and share my posts to keep me coming into your box, 
You won't miss a single post if you Follow by Email or Like my Facebook Page.
Have a great Artful Day,

Wendy