Showing posts with label art tips. Show all posts

Dec 14, 2017

What does it mean "to Draw"? Painting & Drawing Tips

The last couple of months I have been working on a series of post about how to draw, ways to get started, things to focus on, ways to celebrate success.

But I felt something was missing.  
What does it mean "to draw"?  Many people come to me for lessons 'wanting to learn to draw.'  Talking with them I find there are many different answers.  

I searched around the Internet looking for a definition of what it means 'to draw': "In fine art, the term "drawing" may be defined as the linear realization of visual objects, concepts, emotions, and fantasies, including symbols and even abstract forms." Encyclopedia of Art . 

This seems so dry.  Not the real picture.


FAR FROM THE MADDENING CROWD - Certainly how we sometimes feel at this time of year. 

Drawing is an adventure. 

Like any explorer you study your subject and decide where you will start.  Sometimes it is very logical, a shape or a line.  And sometimes you just like the way the lines converge on a spot; eye candy. 

Then you're off and running.  Moving further and further away from your starting point, gathering more and more detail. Refining a spot.  Popping in a dark.  Checking your perspective. Stepping back.  Checking.  Feeling the pull to get back in.  Draw some more. 

Questioning?  What is that? Never mine, go back.  What do you really see?  Don't try to make sense.  Move on.

Suddenly he is alive. 

JOEY - Those eyes just grab you.  It seems like he really is there on the paper. 

Your cat, your bird, whatever you are drawing is there, staring at you, waiting.

You get pulled in again, fix the nose.  Where are the whiskers?  He needs a mouth.   Move along.  You like that feathery pattern.  So soft and yet such sharp points.  Get that soft fluffy spot under his chin.  Keep moving.
JOEY -  8 x 10 - Commission

He's done. There. Alive.


 It's dark out.  Where has the day gone?

Is drawing your adventure?  Do you get lost in it?  Drawing doesn't have to be just with a pencil, next post I will show you different ways I draw.  I am sure you have more as well. 

Looking for more Drawing Tips, check out my previous posts in this drawing series.  

How to Find Your Starting Point in a Drawing - here
4 Ways to Grow the Sketchbook Habit - here
Time to Meet Your Drawing Friends - here
Ready to Start Drawing - Get Your Materials Together - here
Get Those Values Working for you - here
Blenders the Secret to the Soft Touch of Graphite - here 
Values and Colours in Action - here

   Christmas is coming, here are a few ideas for those Art Lovers and Artists on your list:  
- Private Drawing Lessons with Wendy Mould
- Original Art
- Prints, Magnets & Memo Pads featuring Wendy's Work
See my website or contact Wendy to visit her Studio/Gallery to purchase

Etsy Shop now Open: WendyMouldsArt  Come on In!! 

Special Offer: Free Shipping with your order of 5 or more  Christmas Doodle Cards or Get Instant  Down Load with the digital Cards. Print as many as you wish. Still time till Christmas to personalize your cards with colour.  Your Special People will be WOWED by the Cards.

Kitten and Puppy are happy to be featured on those Special Card

Time to Move Inside and Draw
Drop-In & Draw: 
January Dates: Tues, January 9 & January 23, 2018
Expressions Art Gallery, 227 & Lougheed Hwy, Maple Ridge.  
Choose a morning or afternoon session. Bring your sketchbook or your project and come draw.  I will be happy to give you a few pointers as you work on a drawing.  $15 Pre-Register Required. Contact Wendy Here

Be sure to like and share my posts.
 You won't miss a single one if you Follow by Email or Like my Facebook Page. Keep up with all the art events by joining my email list (see sidebar on my blog)

 Have a great artful day,

Nov 30, 2017

Values and Colours in Action - Painting & Drawing Tips

New Works from the Studio of Art by Wendy 

WINTER COLOURS - $225     11 x 14 matted, unframed
Winter Colours features a little Rufous-sided Towhee, which we see a lot in the winter.  Their bright orange bellies add a bit of colour to the birds around the feeder and of course out on a walk.  

This time of year my heart thinks of snow.  As a kid we lived in Nova Scotia and snow, snow forts, skating on the lake, snow storms and no school were the norm.  I loved the fun of snow, especially the no school part and I find that even though I don't like driving in it, I still have a love of snow.  So winter pictures must have snow!  

Values in Action
Painting snow really makes me think of values.  It is white, just like the baby goats in the last drawing post "Blenders the Secret to The Soft Touch of Graphite" .   Now instead of the gray tones of graphite you are dealing with colour.  What happens to the values then? 

Winter Colours - Compare the tonal values with the colours
All those beautiful colours have a value and keeping the value pattern consistent is important.  In working with graphite you used different values to create the 'mass' of the shape.  The same thing happens in colour.  But now you are converting your 'colours' into a value on your value scale.  

Values of Colour
When it comes to working with colour, many shorten the 10 Point value scale to only 5 values. 

There is White, 3 mid-tones and Black
To think of these values in terms of colour think: (From Lightest to Darkest)
Yellow, Yellow orange and Yellow Green 
Orange, Red Orange, Green, Blue Green
Red, Blue
Red Purple, Blue Purple, Purple
Black
Of course within each colour there is a range of values, but having this picture in your mind will help in seeing and converting your colours into value.  Of course, taking a picture and converting it to tonal values is the most efficient method but not always practical when the paint is wet and colours are mixing. 

Note the values of the colours in the leaves - all in the mid tone and black range 

Building Mass with Values
In creating the leaves in the painting, you need the different values to make them 3 Dimensional. At the same time the value range has to be close or the leaves will not read as a unit. After all, they are not the focus of the painting. 
But the real challenge comes with the snow.  Like the goats, the snow is white.  But a white blob would be one dimensional and not have the puffy, billowing feel that is needed. 

Snow can have values that range from white to black!

Again like the white goats there is in fact very little 'white'.  Most of the snow has some value ranging from the light mid tones to the dark mid-tones  and even a spot or two that is almost black.  In some ways it is like Magic.  You are creating the illusion of white snow, yet you are using some very dark values.

Take the challenge and try your hand at snow - either in graphite or paint.  Have some winter fun!!

Looking for other drawing tips, check out my previous posts in this drawing series.  

How to Find Your Starting Point in a Drawing - here

 4 Ways to Grow the Sketchbook Habit - here

Time to Meet Your Drawing Friends - here

Ready to Start Drawing - Get Your Materials Together - here

Get Those Values Working for you - here

Blenders the Secret to the Soft Touch of Graphite - here 

     Christmas is coming, here are a few ideas for those Art Lovers and Artists on your list:

Etsy Shop now Open: WendyMouldsArt  Come on In!! 


Special Offer: Free Shipping with your order of 5 or more  Christmas Doodle Cards or buy the Digital Down Load Cards and print as many as you wish. Lots of time till Christmas to personalize your cards with colour.  WOW! your Special People with your Cards.


Time to Move Inside and Draw
Drop-In & Draw: 
January Dates: Tues, January 9 & January 23, 2018: 10-12pm or 1-3pm
February Dates: Tues, Feb 6 & 20, 2018: 10-12pm or 1-3pm
Expressions Art Gallery, 227 & Lougheed Hwy, Maple Ridge.
Choose a morning or afternoon session. Bring your sketchbook or your project and come draw.  I will be happy to give you a few pointers as you work on a drawing.  $15 Pre-Register Required. Gift Certificates Available. Contact Wendy Here

Be sure to like and share my posts.
 You won't miss a single one if you Follow by Email or Like my Facebook Page. Keep up with all the art events by joining my email list (see sidebar on my blog)

 Have a great artful day,
Wendy

Oct 5, 2017

How to Find Your Starting Point in a Drawing - Painting & Drawing Tips

NEW WORKS FROM THE STUDIO OF ART BY WENDY
THE FIRE DANCE - Ink & Watercolour - Purchase Info

Your Ready to DRAW. . .

But HOW DO you START?

As an artist you are attracted to many things: light falling on a rose; an eagle soaring in the sky; the profile of a young child.  You know what you want to draw but how to get started is a big problem.

Many books and tutorials say, start with a basic shape.  I certainly can see that with a child's face. An oval would be a good starting point. But sometimes I find the shape does not work for me.  I like to have something that will give me Reference Points to move out from.  The large oval or rectangle gives me the size but no help in locating key elements within the subject.

A 'Line of Action' gives me more information.
Poppies are so much fun to draw, I love their flowing lines
When you study the poppy on the right, you can see some very strong lines that define the shape.  For me the strongest line with lots of information is the line of the petal coming forward.
This line gives a sense of size and shape.  It acts as a reference point to other important lines.
Once this first strong line is placed on your paper you now have a point of comparison.  All other lines will be longer or shorter than this one. It also gives you a reference for the the angles of the other lines.

The 2 secondary lines
Drawing in the two secondary lines defines the whole structure of the flower.  Each element builds from them.  By comparing the length and angle of line you draw to your structural lines, you can complete the drawing of each petal.
Hard to believe this is the SKELETON of the poppy!
Once you are happy with the length and angles of your 3 lines you are ready to roll.
Drawing the first petal
Drawing that first petal gives the structural lines meaning.  Once the petal is in place, it is possible to place the stem.  (I have included the other flower in the reference picture so you can also add the little flower pod leaves.  Those little things give your drawing character.)
As each petal is drawn it gives you a reference point for the next one
After the first petal is drawn, you can now see where the one to the right fits in.  Move around the flower drawing each as you go.  Hint: I found it better to draw the area on the left side before drawing the area at the back.  Once your layout is finished, you can go back and refine areas and add your shadows and directional lines.  You can see my finished line drawing here. 

Using Strong Lines is not the only way to start a drawing but it is a GREAT Tool to keep in your Bag of Tricks.  Here is another example:

This strong line gives the shape, the size of the flower and a reference point for placement of the two main petals.
If you would like to have a larger file of these reference pictures to draw with, drop me a line and I will be happy to send them along.

Do you have another way of starting a drawing?  Do you see other strong lines to work with?  Lines and shapes attract us in different ways, there is no one right way to see.  I would love to know what you 'see' when you draw these flowers.

DRAW this POPPY LIVE - Saturday, Oct 21, 2017 
 Opus Arts Supplies, Langley, BC. 
  Registration Information Here

 2 Hands-On Drawing Sessions 11am and 2pm. 

I will be drawing this Poppy for the demo. As you draw with me the focus will be on relationships within a drawing and lines and edges to bring your poppy to life. Throughout the process you will learn how to fine tune your observation skills so that you will begin to see more structural and spatial relationships in your subject. This improves your overall drawing skills.

Register early as these Demos will fill up fast.
$15 Includes a small Starter Kit

If you are just starting your journey into drawing see my first post in this series: Ready to Start Drawing for ideas on basic materials, Time to Meet your Drawing Friends to learn more about your pencils and 4 Ways to Grow the Sketchbook Habit to really get that drawing happening.

Special Note: I will not be posting next week as I am off on a very EXCITING Art Adventure. I will be spending 6 Days with Robert Bateman!! I will report back on my next Post.

 Etsy Shop now Open: WendyMouldsArt  Come on In!! 

Special Offer: Free Shipping with your order of 4 or more  Christmas Doodle Cards or buy the Digital Down Load Card and print as many as you wish.

Special Event:
Artswest Fall Art Show Oct 2-30
Reception: October 14, 1-3pm
Newton Cultural Centre, 13530 72nd Ave, Surrey, BC

Viewing Hours: Tuesday to Sunday 9:30-3:30

Looking to meet and see works by local artists?  Wild abstracts to take you into new places, a crow pensively perched on a log, or mist slowly raising off the water, this is the show for you.
My picture: Crow: The Giver of Light, will be part of the show
To learn more about Artswest see here

Time to Move Inside and Draw
Drop-In & Draw starting: Tues Oct 10, Tues, Oct 24, Tues, Nov. 7 10-12pm & 1-3pm
Expressions Art Gallery, 227 & Lougheed Hwy, Maple Ridge.  

Come for 1 or all 3, choose the morning or afternoon session. Bring your sketchbook or your project and come draw.  I will be happy to give you a few pointers as you work on your drawing.  $15 Pre-Register Required. Contact Wendy Here

 Be sure to like and share my posts.
 You won't miss a single one if you Follow by Email or Like my Facebook Page. Keep up with all the art events by joining my email list (see sidebar on my blog)
 Have a great artful day,
Wendy

Jan 19, 2017

3 Ways to turn Drawing Despair into Action - Painting & Drawing Tips

NEW WORKS FROM THE STUDIO OF ART BY WENDY

It's January, time to start new things. Your new sketchbook and pencils are ready; you want to draw. Flush with excitement you start.

Oh no. That line is wrong, you erase, you start again.  Erase.  Draw a bit more, not quite happy but  keep going.  “I am not going to erase, just draw’” You say to yourself.  But then, it's not right.  Erase some more.  Slowly but surely your confidence wanes and you become discouraged. 

Simple but nice study of a flower
We have all been there.

I did not go to art school.  I did not take art classes in high school. But I did have that passion to create. My journey took me first to fiber and fabric and then to drawing. Learning to draw was a hard journey with many emotional ups and downs. You wonder, how did I keep going.  I learned from my students at school.  I taught in a high school Learning Center helping students with Learning Disabilities cope with school and its demands.  They wanted to be successfully but learning was a frustrating experience for them.

They taught me a lot.

1.    Give yourself little encouragers to keep going: 
No I don’t mean a piece of chocolate when you finish a page, but if that helps try it.  With drawing, it’s the little things that make you feel good.  Materials you like, a sketchbook that is right for your medium. This is not the time to ‘make do’.  Big Books can bog you down – 9 x 12 is nice in the studio 5.5 x 8 for field work.

Working with light and shadows
Start on page 2.  That first blank page has way too much power, flip the page and start working.  You can always glue a special picture on the first page, make it a title page or leave it as a cover. 

Large repetitious areas are discouraging and bog you down. If you are bored, move around the picture.  Mix it up.  Detail work then back to boring fill type areas.  Also, Don’t feel you have to finish every picture.  This is a sketchbook.  Have a focus skill you want to work on, once its done, move on if you like. 

2.    Make that inner critic work for you not against you
Developing a good inner critic is important.  Being able to critic your own work really helps your work improve. But you need to make it work with you.  When you work, stop, look at what is happening on the page.  (If you are sitting, put your book on an easel and step back).

 I know this is when that destructive voice takes over. Beat it to the punch. Ask yourself: What do I like about this picture? What is my favourite spot? What makes it so good?  How can I use that in other parts of the drawing?  See, you have him busy giving you good feedback that is productive. 
Ink & Coloured Pencil - I find this intriguing, it seems to show the stages of development.
3.    Celebrate your successes
I think this is something that is so easy to take for granted.  The drawing is done, you turn the page and move on.  I work in graphite which smudges after a while in a sketchbook.  When I finish a drawing that has lots of shading, I give it a light spray with fixative so it will stay nice. I put my book on an easel at the end of my drawing session. I enjoy my drawings. When I come back into my studio, it gives me a lift to see what I have done. Looking through my book feels good, I have nice, clean pictures to look back on. I can see where I came from, I can see my improvement, and I celebrate that. 
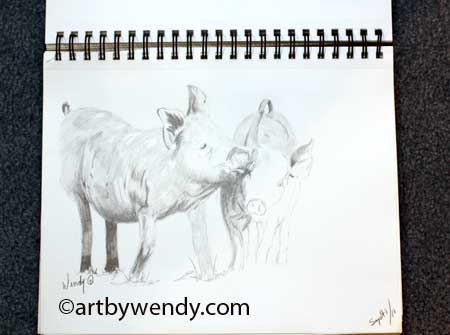
I love these little pigs - To me being unfinished adds to the interest,
Learning to draw can be a challenging and rewarding experience.  But it also is an emotional rollercoaster.  Keeping yourself moving forward will definitely lead to success. 

Do you have tricks and treats to keep yourself on track?  I’d love to hear what works for you.

Getting your drawing skills going is my focus right now.  Next up: Eraser. Your Friend or Enemy?!

 Take the Plunge and start drawing!  If you want some help I have several ways to help:

1. Zentangle Doodle Card Classes: Thursday, Feb 16, 1:30 - 3:30pm & 6-8pm Expressions Art Gallery, Maple Ridge.  Saturday, Feb. 18, 10:30-12:30 (FULL) & 2-4pm. , Art by Wendy Studio, N. Surrey   $30 Supplies Included. We will be working with mice and owls on our Zentangle Doodle Cards  (you knew I would have animals somewhere) Contact Wendy to REGISTER

2. Buy a few of my Zentangle Doodle Cards and start  Colouring. See my collection here.   They are fabulous fun, just imagine how special your cards will be when you personalize them like that.  Those special people in your life will cherish your cards.

3. Private Drawing Lessons -  2.5 hr sessions in my studio, flexible scheduling to fit your schedule. 3 lesson package $225. Beginners to Adanced are welcome.  Adults, Teens and Younger Students. ( $35 for 1 hour sessions for younger students.) more info here

Special Note to Artists: 
February is Marketing Month for Artists, time to really work on your Business Plan. Join me for a full day of getting ready to make 2017 your Best Sales Year ever.  

All day Marketing Workshop - Let's Get Your Art Out There - Sunday, Feb 26 or March 5, 10-3pm.  This is an opportunity to work with a small group focusing on ways that work for you, to market your art.  Whether you are looking at full time or part Art Sales, there are effective, proven strategies that will get your work out the door. $70 Limited to 8 per session.  Art by Wendy Studio/Gallery, N. Surrey, BC.  REGISTER NOW  with Wendy.   Out of Towners  & Skytrainers give me a call and we can set something up.

Etsy Shop now Open: WendyMouldsArt  Come on In!!

 Be sure to like and share my posts.
 You won't miss a single one if you Follow by Email or Like my Facebook Page. Keep up with all the art events by joining my email list (see sidebar on my blog)

 Have a great artful day, Wendy

Mar 17, 2016

A Moment in the Sun!!!! - Watercolour Painting Tip

NEW WORKS FROM THE STUDIO OF ART BY WENDY

Okay, I must admit this posting is all about me. This is Awesome News!!   I am having My Moment in the Sun!!  The International Artist Magazine has 8 full pages featuring my art in their April/May edition!!   I am just thrilled!  I still can hardly believe it. 


When I first started out drawing and painting I read their magazine faithfully trying to learn all the key things to improve my work.  I admired all the artists and hoped to be half as good as them some day. Now suddenly, I am one of those artists.  
It  started last spring when I entered their Florals Show.  No, I wish I could say I was one of the lucky ones that won a prize or got honorable mention.  I wasn't.  But I must have been very close as last fall I got an email from the International Artist Magazine saying they liked my work and wanted me to do an article for them.  I was thrilled.  It was a big job to put it all together but at the same time very exciting.  To see it now in print is Awesome!


Here I am, #108 April/May 2016 edition - Page 102 - Using Salt with Watercolour
Pretty neat, eh??!!

My demo was on using Salt with watercolour and then glazing over this with other colours.  My blog post  Dec 10, Adding Salt to the Mix gives a step by step pictorial tutorial on this.  ( By the way, it is a very effective way to add texture to your work.)
 The Demo page - A Friendly Face in the Forest - my demo picture and a picture of me on the left. 

My feature Picture in the Demo - A Friendly Face in the Forest - Watercolour

You may not have the magazine but you can certainly ready about the creation of this picture and using glazes after the salt has been added on my posts below: 

1. December 10, 2015 - see  Adding Salt to the Mix  

2.  January 14, 2016 - see  Have You Considered the Light

Thank you for indulging me and helping me celebrate my Moment in the Sun.  I really hope that you enjoy a Moment in the Sun in the near future as well.  

 Be sure to like and share my posts. You won't miss a single one if you follow by email or Like my Facebook Page. Keep up with all the art events by joining my email list (see sidebar)
For Commission Works see here
For Private Drawing Lessons see here
For Marketing Mentoring see here
For Marketing or Art Presentations Contact Wendy 
 Have a great artful day,
 Wendy

Feb 25, 2016

Dig Deep for those Greens - Art Tips

NEW WORKS FROM THE STUDIO OF ART BY WENDY

Yes, there will be Green again!!
Red greens, blue greens, soft gentle greens to sink into and those bright garish greens that stop you short!! After last week's crazy Demo Week (see here for more on that) I am ready to get back into the studio and paint.

My best friends, the chickadees, are back in the garden! They are the ones that really bring the life back to the yard.  They chitter, they chatter, they bath in the birdbath.  They flit and they flirt.  Best of all they bring their babies to feed. So cute watching the little ones crying for food, bathing in the bird bath, and sulking when they can’t get their way.  Other birds come and go, never staying long, but the chickadees are my real backyard buddies.  

So of course they need to be featured in my work!!

Sunshine and Sunflowers WIP - Watercolour

My plan: chickadees and sunflowers.  (Okay I admit it.  I am really into the summer more than spring.  But I am ready, aren't you?)

My picture Sunshine and Sunflowers,  is a work in progress now but already you can see the problem.  Green.  I love it: to look at on a summer day, to play on, to feel the softness as I settle down with a book.  But to paint!  It's a challenge.  Everything looks green, local colour is green, green everywhere.  But the whole picture can't be one be blog of green!!

My palette: Daniel Smith GreenGold (GG) , Ultramarine Blue (UB), Alizarin Crimson (AC), Aureolin,(A) Gamboge (G), Burnt Sienna(BS).   (The GreenGold has to be Daniel Smith’s as the other brands just don’t seem to work the same way.  This greengold is the colour of the moss on the branches shining in the sun.  It is that lovely blue green (when you add UB) that brings to mine the firs as you walk down a forest trail.  It just seems to be my kind of coastal green.)

The Challenge: build my greens just with this palette.  I know, easy to grab lots more tubes of paints with greens and browns, and golds, even reds.  But lots of tubes, introduces lots of new colours and suddenly things don’t blend any more.  Stay with your palette and dig deep, there are many subtle ways to suggest green with what you have.  Here is a sample of some of the greens I have created with mixing  UB, A, AC and G with the GreenGold.  The UB + GG I did two samples.  One with a little UB and one with lots.  Just dropping in a little AZ changes it again.  So many greens and green suggestions right here.  


Sample strip of some of the greens mixed with GG.
Note the changes with the purple glaze.(UB + AC)

Those greens were only created with weak and strong mixes.  What about all the colour variations when you start to glaze over them.  Glaze over with a blue, a yellow or a red.  More colours.  I included a glaze of purple (UB + AC) over the test strip once again, lots of different grayed down shades.  Of course another layer creates more. If you go back and look at Sunshine and Sunflowers WIP again, you can see how they blend together and read as green but really are quite different!!

Follow up from last week's post: The 3 presentations went well.  I met some wonderful people, made new friends, and got totally inspired. A really special thank you to Jackie who took the time to send me this comment Sunday night after a full day workshop yesterday on Marketing. 

"Hi, Wendy.
  I just wanted to let you know how much I enjoyed your Marketing Your Art Workshop.  I learned SO much!  It is the BEST workshop I have ever been to on ANY subject.  Thanks so much." 

It really made the whole day worth it for me to hear that.

Well back to work, hope to post the finish picture next week.  (Of course you know what the next challenge will be - working with yellow.  No easy task!!)

 Be sure to like and share my posts. You won't miss a single one if you  Like my Facebook Page  or follow by email.    (see sidebar, top right corner on my blog page)
Have a great artful day, Wendy
For Commission Works see here
For Private Drawing Lessons see here
For Marketing Mentoring see here
For Marketing or Art Presentations Contact Wendy