Showing posts with label painting flowers in watercolour. Show all posts

Feb 3, 2024

Getting Good DARKS into Your Artwork - Painting & Drawing Tips

The Challenge: Make Images "POP' in my Artwork
The How: Use some Good DARKS
Sounds so easssssssy.  But really it's not!

FANTASY FLOWERS - Sketchbook Activity 

You have probably already discovered that.  Either things are too light or there is way too much "dark" in your picture.  There doesn't seem to be a happy medium.  

I decided to do some experimenting to see what a Good DARK really looked like.  And how to tell 'when I was there'.  

 ___________________________________________________________________

*** Further discussion can be found on my YouTube video: How Dark Values bring your Artwork to Life

*** Looking To Join Me for Online Drawing Lessons? 3 Live Online Classes in February. See below for more information

________________________________________________________________

Follow Along with me as I conduct my experiment or better still, start painting too. 

Step 1 - Background in 3 different layers of lights

Step 1 

Create a very light background of splashes and spots.  I used the colours I was planning to use for my flowers.  I only thought was to leave a space for my main subject.  But at the same time I wasn't worried about getting paint in that area as it was light.  

Step 2 
I did 3 different light layers of splashes.  Each slightly darker than the first.  I was also thinking that I wanted to get darker closer to my subject.  

Drawing in the Flowers 

Step 3
Drew in the fantasy flowers.  A rose with a few little forget-me-note around it.  I wasn't worried about any of the colours under the flowers, as I knew it would be covered up by painting the flowers.  

Blocking in the Flowers and Some Leaves

Step 4 
Here is where the fun begins.  I blocked in the flowers and they looked horrid.  No life to them. I press on.  I had to remind myself this is just the first layer.  

Darken the Rose Petals
Step 5
I used a darker version of my pink to add shadow to the rose petals. Still not working. 

Adding Dark Purples to Rose and Deep Darks to background

Step 6
I mixed a purple with my pink and blue and used that as shadows around the petals.  Now that made quite a difference.  

I also placed a real DARK in the crevices around the rose, being mindful that the light came from the left.  Right away I could see some of the petals on the rose perked up.  Even the main leaves started to look more interesting.  

Suggesting more leaves in the Background
Step 7
Rather than bumping up the shadows more with the flowers I adding more foliage around them.  I kept it lighter than than my fully drawn leaves but made it darker than the leaves suggested in splatters.  Right away I could see things were really popping. 

Finished - FANTASY FLOWERS - Sketchbook Activity

Step 8
Put some of that purple on the blue flower (center, left) and on the leaf (center, right) close to the rose;  suggested some leaf shapes at the lower bottom; went back and added a few dark splashes to the shapes spreading out from the middle.  It was popping!!  

Things that I noticed (learned)

1.  Putting a darker pink on my rose didn't do anything. It needed that dark purple to pop.  

2.  Putting a deep dark in the crevices where I would expect to find a dark, made a real difference.

3.  Sometimes it is better to darken things around the subject rather than just getting darker and darker with the subject.  

4.  Not all of the subject needs to be the dark: ie. not all the petal, not all the leaf, not all the blobs 

Experimenting can be fun.  We had 3 days of major snow, and nothing moved.  Very unusual for us.  It was great to play with the flowers and not worry about being snowed in!!

*** Further discussion can be found on my YouTube video: How Dark Values bring your Artwork to Life

Coming Up:
Online Drawing Classes for February 2024
All inclusive 4 Day Art Retreat,  June 21-24, 2024
Outdoor Sketching Classes this summer 2024

Enhance Your Drawing Skills

Come Draw with Me 

I attended an online drawing class from Wendy. I loved it and learned so much. She is very thorough and provides terrific feedback on your works of art. I highly recommend it.”

Ready to Enhance your Drawing Skills and Explore new Mark-making Techniques in a relaxed, fun setting? 

During your Lessons You will:

- Learn 
when it’s best to erase and when to wait

- Dive into the little Secrets that make drawing a success

- See how light can transform your subjects

- Make friends with your inner critic and make it work for you

- Nail down that perfect perspective and proportion

- Use lines, shapes, and shadows to guide your viewer’s eyes and keep them engaged in your work

Online Drawing Classes

Feb 15, 22, & 29, 2024, 5:30-7:30pm (PT)

Early Bird $75 Before Feb 12, $90 after

Contact Wendy toRegister 
Gift Certificates Available 


Original work, Commissions, Private Drawing Lessons, Prints and Cards of her Work, 

Be sure to like and share my posts.  You won't miss a single post if you Follow by Email 
Have a great Artful Day,


Wendy


Apr 18, 2022

Learning to Draw with your Pen Joyfully - Painting & Drawing Tips

Are you planning your Spring Planting?  Looking at seed catalogues?  
Wondering in the Garden Shops?
Bringing home the bundles of Tulips from the grocery store?

POPPIES IN THE FIELD  - Sketchbook Practice 

Spring is nearly here. I am hounding the garden shops, checking out the flower beds on my daily walks, waiting for the colour.  

 I don’t have a big garden any more but I love to have a few baskets on the steps and patio.  I find I love the neat lines of colour as I set my pots in place.  But somehow as the weather warms and the plants grow, things become wild and free.  I love that look even more.

 Drawing with a pen is like that. . .

Do you find as you start to draw with pen there is a feeling of permanence. The marks must be exact.  It can not be changed. Lines are neat and orderly. 

But the lines can be like those flowers, once they begin to grow they can become wild and free.  Full of confidence and joy. 

 But, How you ask, can one get that confidence and Joy.

The answer is practice.  But of course there is more to it than that.  Meaningful practice helps.  But I find practice only works if I feel some success.  A sense of growth.  A feeling of confidence. Joy. 

A Joyful Way to Get Loose with your Pen

NB: There is a video version of the blog post with more examples - See "Get Loose with Your Pen Work" video.  

1.  Grab your watercolours and a brush - no reference - just put blobs of paint on the page to indicate where a flower might go.  5 blobs is a good starting point.  

 My 5 blubs of colour

2.  Loosely paint in stems and branches.  Keep you colour light so ink work will show later.  

Don't worry about making perfect leaves, have fun with the shapes

Working without a references helps gives freedom to your line work. It feels scary, I know, but you will see you don't really need one.  Drawing like this helps you move freely on the page and not feel any of your marks are 'wrong'.  

3.  Practice this simple poppy flower.  While your paint is drying practice making this simple poppy.  Make them all different sizes and facing in different directions. 

Draw the bottom 2 petals first, then add the 3 at the back

4.  Draw flowers, leaves and stems on your painting.  Don't worry about keeping the colour inside the lines.  You will see the lines will capture they colour as you go.  Also, having a bit of white space inside your shapes, creates a lot of interest. 

Drawing the flowers, stems and leaves

5.  Keep drawing until you are finished.  Don't hesitate to add more leaves and flowers to fit your scene, even if there is no painted area for them.  Note my finished picture at the beginning of the post,  has a leaf added to the left side and there is no paint there.  

6.  Try working with another shape.  I have painted a simple log and stump shape in my book. I did play with a few lights and darks but tried to keep it simple.  ( I did get a little carried away as I love painting and drawing old stumps. )

My simple log and stump  

2.  Adding line work.  Picture a log and stump in your mind and start some line work.  Don't worry about staying within the coloured area.  Note the bits of white on my stump where I enlarged it and reshaped it.  Add marks: light, dark, squiggles, dots.  Watch and see what they do.  Sometimes encapsulate the darker values and other times ignore them.  Let your pen move freely.  

Add a bit of foliage.  Stumps and logs always have leaves, sticks, and plants scattered around them. 

Note how my line work breaths life into this simple painting

3.  Adding more colour.  This is always an option after you add your pen work. I encourage you to do this after you add your ink work.  This will help you feel loose and free.  Too much colour detail makes you want to follow the lines.  Remember when you add the extra colour it does not have to fit into the line work.  In fact leaves for example with no line work add depth to your bushes. (Note my bushes on the left side of the stump)

A Simple picture but one that makes me happy when I look at it.  

This might be a new way for you to practice your line work but I think you will find it rewarding and helpful in building your confidence and finding your joy.  

You will find more examples and further information in the video version of the blog post - See "Get Loose with Your Pen Work" video.  

Outdoor Sketching Classes - Starting May 27!!!

Outdoor Sketching Classes are 2.5 hr sessions and located in parks in North Surrey and North Langley.  Beginners to Advanced are Welcome.  Mediums supported: watercolour, pen, pencil, watercolour pencils and coloured pencils.  You can sign up to as many sessions as you like.  Class Size: Max 3.  $50 per session.  

Class Dates: 
May 27: 10-12:30pm
June 9 & 16: 10-12:30pm
July 7 & 21: 10-12:30pm
Aug 4 & 25: 10-12:30pm
Sept 1 & 8: 10-12:30pm 

Arrangements made for inclement weather.  
You are welcome to contact me for help in organizing your supplies for an Outing.  

 I am available for booking special outings for you and 1-2 of your friends. 

Gift Certificates are Available

Contact Wendy to register 

 Move your work to NEW LEVELS?  

Contact Me for:

1. Private Drawing Lesson: (3 Sessions 2.5 hr each $250)  North Langley, BC (Walnut Grove) 
Do you want your animals to breath, your flowers to sparkle or your people to walk?  Whatever subject your like to paint or draw I can build a drawing program for you.  Private Lessons allow you to focus on the skills you wish to develop.  Wendy is a experienced teacher, providing a calm, relaxing experience as you learn how to use the principles of drawing.  Beginner to Advanced are welcome.  Special rates for younger students.  Contact Wendy for More info

2.  Online: Teaching, Mentoring or Critiquing Your Work - Don't live in the Fraser Valley,  I would be happy to tailor a program just for you online.  Drawing and Painting Lessons, Mentoring you on your Art Journey or Critiquing Your Work with an Eye to Move It Forward.  Drawing & Painting Lessons: 2-30 sessions $75.  Mentoring or Critiquing 30 minutes sessions $25.  Flexible schedule and sessions can be longer or shorter depending on your goals. 

3.  Available at Art by Wendy's Studio
Original work, Commissions, Prints and Cards of her Work, 

Be sure to like and share my posts.  You won't miss a single post if you Follow by Email 
Have a great Artful Day,
Wendy

Mar 20, 2022

Bringing Translucent Light into Your Watercolours - Painting & Drawing Tips

First we had Transparent then Opaque, now Translucent!!??
Starting out in watercolour?  Overwhelmed by the choices?

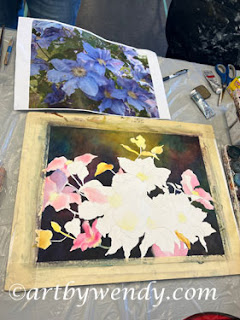
My Clematis - WIP - Note the depth in my background and flowers 

 I certainly know how you feel.  When I started with watercolour I could not get a handle on 'what was what' or 'why it mattered'.  REALLY,  just dab your brush in colour and paint.  


What's hard about that!! . . . . . . .

LOTS APPARENTLY!

Last week I found out lots more about this NEW World.  Of course I have painted long enough to know the difference between Transparent and Opaque and why it is important.  I actually felt I was well on my way.  

Getting started on the Background


My art group arranged a 2 day workshop with Marney-Rose Edge, a well known local artist, known for her work in florals.  Marney creates florals with deep, warm, dark backgrounds.  Her work seems to let you see into the depths of her flowers and the background of her pictures.  It was a joy to work with her.  

Marney likes to start with the background.  

In this case we were planning to create a dark background that was luminous and had a great sense of depth.  So painting it first was the way to go.  It is painted in layers

Layer 1 
This is the really fun, free for all layer.  Get your colours down and rich and pretty.  You can be loose here but make sure you keep them apart.

More layers on the Background 


Layer 2
Time to tighen up a bit. This is when you begin to create your background depth.  Want leaves, make some greens. Want some flowers, make some purples.  This is where your transparent colours shine.  Putting a yellow over that bright green in the first layer makes for an interesting green.  Use a warm and cool yellow in different places makes for variety in the greens.  

Marney has her own formulas and this is where you need to pull out yours.  What are the colours you use.  What colours do you create by glazing over them?  
I found this an interesting exercise.  Certainly I do a lot of glazing in my work but never really looked at it that carefully.  Putting darker colours as the bottom layer really changes what happens when you paint a thin layer of another colour on top.  

Really pushing it to the Dark Side 


Layer 3
Pushing back and getting dark.  This is a real game changer.  Painting over all the colour with a dark glaze of Payne's Gray is scary and final.  You are not getting much of that bright colour back.  However, you can see some of those colours below - Luminous Depth.

Painting the flowers was a very similar process.  Underlying colours were put on.  They dried and then new colours were created by using glazing techniques.  

Blocking out the flowers with underlying colour

My Take-Aways for success . . .

1. Don't fiddle when you are glazing.  Easy to do I know. But when you are painting a colour overtop of another colour you have to have a wet soft brush.  One or two swipes is all you get.  You fiddle and you start to lift the underlying colours.  Good bye Depth, hello Mud.  

2.  You need to use transparent colours.  These colours allow you to see the white of the paper through them when you paint.  Opaque colours block out the white of the paper.  So when you paint over a colour you can still see a bit of the colour underneath. Now you have a reason to recognize the different between opaque and transparent colours.  

3.  Have a test sheet handy.  The test sheet needs to be the same kind of paper you are working with.  Use it to test your colour strength and to see what happens when you paint over a colour with a thin layer of a different colour.  This is where the magic happens.  Test your favourite colours and see what works for you.  Mixing colour on your paper leads to lots of interesting variations.  

My Clematis WIP- Note the colour in the flowers from the different colours under and glazed over. 


I haven't finished my picture yet and I may not.  I like having the different stages there so I can see how they are affected by the layers.  I like glazing and use it alot with my birds and animals.  This class really pushed me into some new colours and to experiment more with my favourite ones. 

Have fun with your experiments and see you soon. 

Outdoor Sketching Classes Starting in Mid-May:  

Outdoor Sketching Classes are 2.5 hr sessions and located in parks in North Surrey and North Langley.  Beginners to Advanced are Welcome.  Mediums supported: watercolour, pen, pencil, watercolour pencils and coloured pencils.  You can sign up to as many sessions as you like.  Class Size: Max 3.  $50 per session.

Contact Wendy to get on my Early Registration List 


 Move your work to NEW LEVELS?  

Contact Me for:

1. Private Drawing Lesson: (3 Sessions 2.5 hr each $250)  North Langley, BC (Walnut Grove) 
Do you want your animals to breath, your flowers to sparkle or your people to walk?  Whatever subject your like to paint or draw I can build a drawing program for you.  Private Lessons allow you to focus on the skills you wish to develop.  Wendy is a experienced teacher, providing a calm, relaxing experience as you learn how to use the principles of drawing.  Beginner to Advanced are welcome.  Special rates for younger students.  More info here.

2.  Online: Teaching, Mentoring or Critiquing Your Work - Don't live in the Fraser Valley,  I would be happy to tailor a program just for you online.  Drawing and Painting Lessons, Mentoring you on your Art Journey or Critiquing Your Work with an Eye to Move It Forward.  Drawing & Painting Lessons: 2-30 sessions $75.  Mentoring or Critiquing 30 minutes sessions $25.  Flexible schedule and sessions can be longer or shorter depending on your goals. 

3.  Available at Art by Wendy's Studio
Original work, Commissions, Prints and Cards of her Work, 

Be sure to like and share my posts.  You won't miss a single post if you Follow by Email 
Have a great Artful Day,
Wendy

Sep 12, 2019

Watercolour- Really?? Wet by Wet? - Painting by Drawing Tips

No, Not a Misprint - Wet by Wet, is a Watercolour Technique


POPPIES, FULL OF LIFE - watercolour mounted on wood cradle, 14 x 22 inches, $850

Painting watercolour wet into wet is the norm and certainly a technique most watercolourist employ at some point in their work.  I certainly struggled with this method many times as I learned to paint.  And yes, it is now something I do in my work.  But the more I painted the more I realized it doesn't tell the whole story.  Working with my latest picture, Poppies, Full of Life, I realized I really wasn't working wet into wet. . .

I was working wet by wet.

In the true sense of the wet into wet technique, you mix the colours on your paper.  Adding one colour to the other when they are wet.  The colours will mix, or not, depending on the pigments as they move about the space.  They will certainly give an array of  colour you can not get with a simple brush strokes.  Definitely, one of the reasons why watercolour is such a special medium.

So what is Wet by Wet?

Paper is wet, a colour is down but the new colour is added beside the other colour, not into it.  Sounds easy enough but as you know, when it comes to matching water and pigment, nothing is that simple in watercolour.  


Wet by Wet - notice the space between the colours and the bleeding of colour into the neighbouring one.
Close up from - Poppies, Full of Life

In my Close Up from Poppies, Full of Life, you can see how the new darker green pigment is being added to the area around and into the lighter green and but only close to the red poppy suggested in the background. Notice how the pigments bleed together making a soft edge but still keeping their own areas of colour.  This is the big difference between Wet into Wet and Wet by Wet.  With Wet by Wet, the two neighbouring colours are not changed only their edges are affected.  (See more on the painting of the background of Poppies, Full of Life on my last post, here)

This 'softness' is the key . . . . 


Poppies Full of Life - WIP - notice how the edges within the poppies are soft (middle flower) and the edges in the background are all soft

Why the soft edge?

A soft blended edge is needed in many places within a painting.  Looking at Poppies, Full of Life - WIP you can see it:
1.  In the background to suggest leaves, branches, other blossoms
2.  Within the blossoms to suggest petals, shadows, highlights
3. Within the leaves and buds to give a gradual colour change rather than a sharp one.

Special Note: In this particular painting, I particularly liked the loose, plush look of my flowers which is a different look to one that is created through layers of glazing.  I did some glazing later to add the deep shadows and define the markings.  


Close up of blossom BEFORE final glazing for shadows - Note the loose, plus look the blossom has.  Only needed to add the shadows with a bit of glazing. 

How to do Wet by Wet . . .

Okay, now you are not going to be very happy.  This technique is a balance of water, pigment and doing a single stroke.  This is a no 'fiddle around' technique.  (You know,  you touch the brush again and again to an area, rather then one stroke and leave it - Fiddle Around) You will need to practice this technique a lot,  to get the balance of water and pigment correct.  Also, when using new colours, I would suggest doing a little test first.  You never know when your pigments might have their own idea when they touch.  

Things to note:
1. Works best on good watercolour paper. I use Arches 140 taped down
2.  Paper is wet but not sopping and warped.  
3.  Brush is wet but not dripping
4.  When you touch the paper with the brush the pigment moves out slowly not spreading quickly
5.  Let things dry naturally, no blow dryer.
6.  The amount of pigment on your brush is determined by what you are painting.  You only get one swipe so make it a bit darker than you think as your paint dries lighter.
7. Work quickly as your paper/paint dry quickly
8.  To wet your paper if too dry, use a fine mist over a larger area than what you need. 
9.  Apply paint with as few strokes as possible (no Fiddling) 

Lots to think about I know, but worth the practice.  I find I use this technique in some form all the time in my work.  Keep at it.  You will be happy when you have it.  

Other things you might be interested in:

Using Glazes to Finish the Background

The Secrets of Watercolour Paper

Painting those Pesky Backgrounds

Looking to move your Drawing Skills to the Next Level?

Contact Me to Register ↓↓↓↓
Upcoming Drawing Classes: 

Sunday, September 22 & 29, Beecher Place, Crescent Beach, S Surrey. 1-3pm. $40 ea.
Part 1: Get that Line Drawing Right - Sept 22
Part 2: Values, Light & Shadows - Sept 29
Beginners to Advanced Welcome.  Come to one or both.      
Drop-In and Draw
Monday, September 30, 1-4pm Beecher Place, Cres. Beach $20.  Get tips on old projects or new. 


Contact Wendy to Register and for more information.  

OR Book a 3 Pack of Private Lessons with Me - 3 Lessons 2.5 hr each $225
Based on your Schedule at my Studio, N. Surrey. 

September 19-30 I will be at Beecher Place with Art Theo featuring Art by myself, Doris Biddle and Donna Schipfel.  During our stay we will be offering classes and showing/selling our work. I have Drawing Classes on the Sundays (Sept 22 & 29)  and a Drop-In Session (Sept 30)  for those that want to practice more from the classes or would like help in their own projects or starting new ones.

Doris will be offering a 2 Day class working with Acrylics $80 and a Ceramic Painting class $45.  Donna will be offering 2 classes on Watercolour on Rice paper $40 ea.

FYI
I am scheduled for a Demo at Opus this fall: 

 Drawing: Values, Light & Shadows Saturday, Oct 19, 11-12:30 or 2-3:30 Free 
Contact Langley Opus to Register  604.533.0601


My Etsy Store is always OPEN: Etsy - WendyMouldsArt

Originals, Prints, Commission Work and Instant Printable Cards for all Seasons available.

Be sure to like and share my posts to keep me coming into your box, 
You won't miss a single post if you Follow by Email or Like my Facebook Page.
Have a great Artful Day,

Wendy