
First we had Transparent then Opaque, now Translucent!!??Starting out in watercolour? Overwhelmed by the choices?
 |
| My Clematis - WIP - Note the depth in my background and flowers |
I certainly know how you feel. When I started with watercolour I could not get a handle on 'what was what' or 'why it mattered'. REALLY, just dab your brush in colour and paint.
What's hard about that!! . . . . . . .
LOTS APPARENTLY!
Last week I found out lots more about this NEW World. Of course I have painted long enough to know the difference between Transparent and Opaque and why it is important. I actually felt I was well on my way.
 |
| Getting started on the Background |
My art group arranged a 2 day workshop with Marney-Rose Edge, a well known local artist, known for her work in florals. Marney creates florals with deep, warm, dark backgrounds. Her work seems to let you see into the depths of her flowers and the background of her pictures. It was a joy to work with her.
Marney likes to start with the background.
In this case we were planning to create a dark background that was luminous and had a great sense of depth. So painting it first was the way to go. It is painted in layers
Layer 1
This is the really fun, free for all layer. Get your colours down and rich and pretty. You can be loose here but make sure you keep them apart.
 |
| More layers on the Background |
Layer 2
Time to tighen up a bit. This is when you begin to create your background depth. Want leaves, make some greens. Want some flowers, make some purples. This is where your transparent colours shine. Putting a yellow over that bright green in the first layer makes for an interesting green. Use a warm and cool yellow in different places makes for variety in the greens.
Marney has her own formulas and this is where you need to pull out yours. What are the colours you use. What colours do you create by glazing over them?
I found this an interesting exercise. Certainly I do a lot of glazing in my work but never really looked at it that carefully. Putting darker colours as the bottom layer really changes what happens when you paint a thin layer of another colour on top.
 |
| Really pushing it to the Dark Side |
Layer 3
Pushing back and getting dark. This is a real game changer. Painting over all the colour with a dark glaze of Payne's Gray is scary and final. You are not getting much of that bright colour back. However, you can see some of those colours below - Luminous Depth.
Painting the flowers was a very similar process. Underlying colours were put on. They dried and then new colours were created by using glazing techniques.
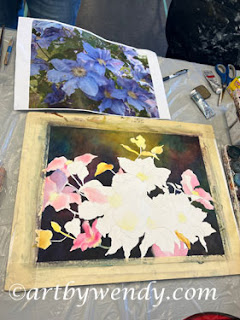 |
| Blocking out the flowers with underlying colour |
My Take-Aways for success . . .
1. Don't fiddle when you are glazing. Easy to do I know. But when you are painting a colour overtop of another colour you have to have a wet soft brush. One or two swipes is all you get. You fiddle and you start to lift the underlying colours. Good bye Depth, hello Mud.
2. You need to use transparent colours. These colours allow you to see the white of the paper through them when you paint. Opaque colours block out the white of the paper. So when you paint over a colour you can still see a bit of the colour underneath. Now you have a reason to recognize the different between opaque and transparent colours.
3. Have a test sheet handy. The test sheet needs to be the same kind of paper you are working with. Use it to test your colour strength and to see what happens when you paint over a colour with a thin layer of a different colour. This is where the magic happens. Test your favourite colours and see what works for you. Mixing colour on your paper leads to lots of interesting variations.
 |
| My Clematis WIP- Note the colour in the flowers from the different colours under and glazed over. |
I haven't finished my picture yet and I may not. I like having the different stages there so I can see how they are affected by the layers. I like glazing and use it alot with my birds and animals. This class really pushed me into some new colours and to experiment more with my favourite ones.
Have fun with your experiments and see you soon.
Outdoor Sketching Classes Starting in Mid-May:
Outdoor Sketching Classes are 2.5 hr sessions and located in parks in North Surrey and North Langley. Beginners to Advanced are Welcome. Mediums supported: watercolour, pen, pencil, watercolour pencils and coloured pencils. You can sign up to as many sessions as you like. Class Size: Max 3. $50 per session.
Contact Wendy to get on my Early Registration List
Move your work to NEW LEVELS?
Contact Me for:
1. Private Drawing Lesson: (3 Sessions 2.5 hr each $250) North Langley, BC (Walnut Grove)
Do you want your animals to breath, your flowers to sparkle or your people to walk? Whatever subject your like to paint or draw I can build a drawing program for you. Private Lessons allow you to focus on the skills you wish to develop. Wendy is a experienced teacher, providing a calm, relaxing experience as you learn how to use the principles of drawing. Beginner to Advanced are welcome. Special rates for younger students. More info here.
2. Online: Teaching, Mentoring or Critiquing Your Work - Don't live in the Fraser Valley, I would be happy to tailor a program just for you online. Drawing and Painting Lessons, Mentoring you on your Art Journey or Critiquing Your Work with an Eye to Move It Forward. Drawing & Painting Lessons: 2-30 sessions $75. Mentoring or Critiquing 30 minutes sessions $25. Flexible schedule and sessions can be longer or shorter depending on your goals.
3. Available at Art by Wendy's Studio
Original work, Commissions, Prints and Cards of her Work,
Be sure to like and share my posts. You won't miss a single post if you Follow by Email
Have a great Artful Day,
Wendy
No comments:
Post a Comment