Showing posts with label glazing watercolours. Show all posts

Jul 3, 2025

The Best kept SECRET of Mixing Watercolours - Painting & Drawing Tips

Watercolours have SECRETS.  Lots of Secrets.  
I discovered a Big one while on my painting trip to Ireland.  

An Iconic Painting for my Ireland Sketchbook

Ireland is green. I mean really green. It makes us here on the West Coast pale in comparison. So when it comes to painting in Ireland, you need to deal with 'all the green'. Light green, dark green, mauvy green, blue green, yellow green, golden green. . . Tons of different greens.

Hearing about all the greens of Ireland, I knew I was going to have a challenge for my Sketching on the trip. Before I had left on my trip I did introduce a new yellow (Quinophthalone Yellow - DS) and a new green (Green Apatite Genuine - DS) to my travel pallet. I was planning to make new mixes with them. The Green just didn't work at all. The yellow however opened up a new world for me.

That’s when I discovered the biggest secret of all. ******************** For further discussion and examples see my YouTube Video: 4 Ways to Mix Watercolours **********************

Mixing in the palette just doesn't always cut it. I like to use a premix green (Sap Green) in my outdoor pallet and then I push it towards a warm or cool colour by adding different colours to it. ie. adding Ultra Marine to Sap Green gives a nice blue green. You probably have your own recipes that that, too.

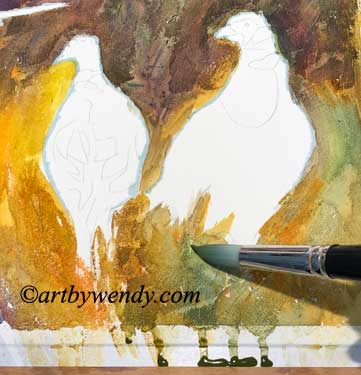
Sap Green and Quinophthalone Yellow with my Yellow underpainting
But here’s the Problem:

I took my cold yellow Quinophthalone Yellow, and mixed it with my soft green to get a nice lime green to put in the sunshine. That’s not good enough here in Ireland you need a variety of lime greens. So I tried something new for me.

I took my cold yellow, and I did lots of under painting with it. Some of it quite heavy and some very lightly. I had started working with this before my trip but only in small sections. On my sample above, I started very dark and then slowly lightened up. Then let it dry.

While it was drying I mixed the green and yellow wet into wet. Letting each colour mingle and move. This is one of the more common ways of changing the colour.

Bottom line - Wet into Wet; Top line right, premixed yellow & green (light and dark) 

Once the underpainting of yellow on my sample was dry, I glazed over it with my green. See Below. (Glazing is painting a thin layer of paint over a dry layer of paint.) Looking closely you can see having different values of yellow in the underpainting creates some very subtle variations in my lime green.

You are not limited to doing this only once. Glazing over the yellow with several layers of green also can vary the intensity of the resulting color. (You can glaze over a colour many times but be sure and make sure all the underlying layers are dry and only do light layers each time.)

Glazing the Green over the Yellow

I decided to take things one step further.  I did an underpainting of the green and then glazed over it.  See Below.  
Glazing Yellow over the Green

For each of the swatches I tried to have the darkest, strongest pigment on the left and get lighter as I moved to the right.  When you study the samples you can see very subtle differences in turns of value and hue.  But when you see the results in a picture it becomes very clear. 

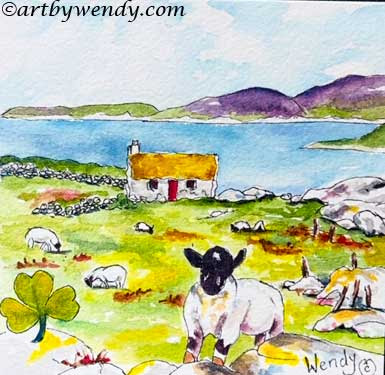
My Iconic Ireland - Note all the different 'greens'

 As you study my little picture you can see how those subtle greens are soft, dark, warm and cold. The center midground and foreground have an underpainting of yellow. I used not only yellow and green glazes but also blue as a glaze over my greens.  

******************** For further discussion and examples see my YouTube Video: 4 Ways to Mix Watercolours **********************

Glazing over a colour can create very subtle colour changes in your painting.  It is certainly something you may want to spend more time on. 


Taking Registrations for my Spring/Summer Events: 

  • Create Your Own Adventure - Let's go Outdoor Sketching  2.5 hr $85 Ind.  Sm Group Rates $65ea  Contact Wendy to set up a date. Location: Lower Mainland

  • Sept 29, 6-8pm - Art Critique - Join me for a gentle critique on one of your paintings,  is the perfect space for discussion, learning, and creative growth. FREE   Registration Required - Langley Arts Council 

  •  October 5, 9:30 -1pm - Make Friends with Your PenThis playful workshop helps you loosen up, build trust in your lines and discover pen work can strengthen your overall drawing skills.  Mission Arts Council: Register 604- 826-0029

  • Save the Date:  next set of 3 Zoom classes Thursdays, October 9, 16 & 23. Study of Shadows & Colour - Enhancing Your Drawing & Painting Skills.  Early Bird: $75 after Oct 7, $90

Original work, Commissions, Private Drawing Lessons, Prints and Cards of her Work, 

Be sure to like and share my posts.  You won't miss a single post if you Follow by Email 
Have a great Artful Day,


Nov 14, 2019

The Creation Process: Idea + Effort = Success NOT!! - Painting & Drawing Tips

As Artists we are all familiar with the Creative Journey, it is one we travel often. And with a great deal of enjoyment.

However, the Creative Journey is not always filled with joy . . .

Organized my colours, clean my water and I am READY TO PAINT!!!

You know what I mean. Every Creative Journey starts with a Big Idea.  It is tossed about in your mind until the urge to follow through can no longer be ignored.  Then you begin. . . 

Everyone's journey is different. Some fast. Some slow.  Some methodical. Some haphazard.  There is no right or wrong.  We each have our own method.  

As you know I started my picture of the Ring-Necked Pheasants  2 weeks ago and I blogged about the planning stage.  (See here to read more) I did more planning than usual because I was trying something new, molding paste.  

Close Up of painting on the molding paste.  See how the colours are changed by the paste.  Lines forming where there are ridges in the paste.  Does make for interesting texture. 

Well, I am here to tell you, the Creative Journey is not always filled with joy . . .

There can be challenges.

1. I was really being good and first did colour swaths to make sure of my colours.  Well, that didn't work as I soon found out.  The paste tends to grab the pigment sometimes making it more opaque than when just on paper.  Colours didn't mix on the pasted area properly.  Sometimes they ran along the lines created by the molding paste and showed up somewhere else.  

Tried out different colour combinations to see what I liked.  Little did I know that they would not look like this when I painted them.  

It took awhile but I learned: no big wet washes.  For a real splash of colour, brush had to be fairly dry.  

After Painting the background I was excited but a little worried.  (Blue edge on birds is the frisket) 

2. The foreground just seemed to be a out of control.  

I took a picture and changed it to the grayscales to see if it followed my Notan sketch.  It did but still  . . .(See Notan sketch on other post here ) 

I really found I had to be patient.  I needed to work with the patterns of grasses in the foreground but I needed my pheasant painted in before I dealt with them.  The foreground would not make sense until the pheasant were there to give it some meaning.  But it was hard to leave it alone...

As the birds began to appear the foreground begins to make more sense.  I have started to add a few darks in places to suggest grasses and small bushes. 

3.  Glazing colour over another colour, something I love to do, was very hard.  It was easy to lift pigment off the molding paste so that really helped in making corrections and changes.  But when it came time to glaze over an area to create depth there were problems.  Brush too wet, colour underneath lifted.  Worked an area too much, colour underneath lifted. Underlying pigments not dry when glazing, colour underneath lifted.   Fiddle with a spot (not that any of us would do that), colour underneath lifted.  Needless to say I painted several areas more than once.  

Yes, I did have moments when I was frustrated and discouraged.  The joy was not with me.  However, my idea was still burning in my head.  Once I painted that first pheasant in the back I was hooked.  I was determined to finish.  I wanted to see how my idea would play out.  

RING-NECKED PHEASANT IN THE FIELD - Matted 16 x 20, watercolour.
 Very pleased at how it turned out.  Lots of interesting things happening in the foreground, glazed several times to change the colours.  (note around the head of the middle Pheasant) even reshaped the background a bit.  

I really started to listen and pay attention to my materials and try and learn how to work with them instead of fighting them.  That lifting thing turned out to be really great.  I was able to lift off lots of pigment and really start again in parts of the background that I felt had gotten too dark.  I did glaze. A lot.  I made sure things were really dry before moving into an area.  I was patient.  (sometimes it is best to just take Max for a walk and let things get good and dry.  Max loved that part).  I tested my brush constantly to monitor how wet/dry it was. I even started to feel the joy again. 

Black & White Study of RING-NECKED PHEASANT IN THE FIELD
Always intersting to see the finished picture in black and white.
 I can really see that there are lots of interesting shapes to balance with my Pheasants. 

And best of all, I finished it.   

Are your Creative Journeys full of turmoil and challenge or do they run smoothly?  

Next up, my Intober Tangles 2019 Collage - didn't quite finish it in October, but Wow! Wait until you see it.  

Looking to move your Drawing Skills to the Next Level?
Join me in November and December to Make Christmas Cards using Doodles and Candles.  See info below ↓↓↓↓↓↓↓↓

Contact Me to Register ↓↓↓↓


Get Ready for Christmas!! with a Fun Way to Improve your Drawing Skills
This year's theme is Candles, Holly and Poinsettias - Samples of things you can do with them

Christmas Card Classes 
Saturday, Nov 16, 10-12pm. Art by Wendy's Studio, North Surrey
Wednesday, Dec 4, 1-3pm. Gardenworks at Mandeville, South Burnaby
Treat your Friends to a Special Christmas Greeting
All supplies Incld $40      Contact Wendy  Gift Certificates Available 

OR

Book a 3 Pack of Private Lessons with Me - 3 Lessons 2.5 hr each $225
Drawing lessons in graphite, carbon, ink, watercolour, watercolour pencils or coloured pencils.
Based on your Schedule at my Studio, N. Surrey. 
Gift Certificates Available 

My Etsy Store is always OPEN: Etsy - WendyMouldsArt

Originals, Prints, Commission Work and Instant Printable Cards for all Seasons available.

Be sure to like and share my posts to keep me coming into your box, 
You won't miss a single post if you Follow by Email or Like my Facebook Page.
Have a great Artful Day,

Wendy