Showing posts with label how to transfer a drawing. Show all posts

Mar 13, 2023

A Quick-n-Dirty Way to Transfer an Image to Watercolour Paper - Painting & Drawing Tips

I know Quick you want, But Dirty . . . Not So Much

Always Fun to Transfer Images to New Surfaces - NEW: My Mushroom Families Collage Fodder
See my Collage Fodder Pages Here 


As many of you know I have fallen in love with drawing images for Collage Fodder. It is part of my DAILY Practice.  I find it challenging to design small images.  I am constantly looking for new topics.  

**Note: There is additional information on transferring your image to a new surface on my YouTube video:  Quick and Easy Way to Transfer an Image to Watercolour Paper.

I also like to use my images in my daily life.  Some I have printed onto sticker paper and added them to notes, journals, my sketchbooks. . . things I use in daily life.  They do add a Sparkle.  But I realized that gluing/sticking them places is not enough.  

Sometimes you want to transfer them onto another surface . . . . 

Watercolour paper was the first thing that came to mind but I am sure there are others.  Now you want the image drawn on that surface.  You can draw if yourself but run the risk of damaging the fibers of the paper if you do any erasing.  It is better to work out the drawing on a different surface and then transfer it over when ready.  Or in the case of the collage fodder just transfer it over.  

So You need a Quick-n-Dirty way to move your images around . . . .

A Quick-and-Dirty way to transfer a drawing 

*** Side Note: Carbon Paper, the old standby from bygone years is not a friendly substance for watercolor or pastels to play with.  
Graphite Paper, although quite good, is expensive, hard to find, & can get messy if not handled carefully.  For big projects great but certainly not necessary for small projects.  

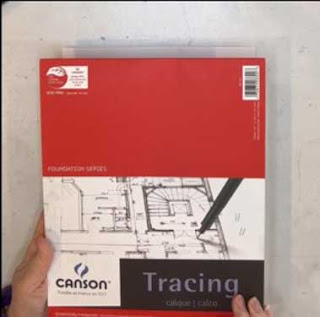
My favourite tracing paper - be sure and check you can 'see through it' before you purchase it. 


1. Use a Piece of Tracing Paper:
 Label the tracing paper placed over the image with the word "Front".  

Trace the image onto the tracing paper on the front side of the tracing paper


2. Trace the original image onto the Tracing paper.

3.  Put Graphite onto the Back of the Paper: 
Take the tracing paper your image is on and turn it over.  Use a HB or 2B pencil to trace over the lines on the back of the paper.  

Redraw the image on the Backside of the Tracing paper


4. Set up the Image on new surface:
Turn the tracing paper over again so the front is facing you.  Place your paper onto the new surface.  Secure one side with painters tape.  

Place the tracing paper where you want the image on the new surface and redraw the image. 


5. Draw the Image on the new surface: 
Use a pencil to 'draw over your image'.  The pressure of your line will cause the graphite on the backside to be deposited on the new surface.  Press hard enough for the new graphite line to show but not so hard that you score the paper surface. 
Check as you go by flipping your tracing paper up.  You may have to tidy up the lines with your pencil on the new surface.   
  
Lift and check the lines are correct on the new surface.  Make corrections as needed. 

6.  Lift and Check:
Before you take your image paper completely away, lift and check all your lines are there.    When complete, remove the your image paper and you are ready to go. 

Side notes: 
**I use this method a lot when I have a detailed drawing I am working on.  I get the shapes right on a separate sheet of paper and then transfer it to my "good surface".  Thereby keeping the 'good surface' free of extra marks.  

**I prefer to just draw the lines rather than shade the whole area, as it keeps the new surface cleaner.  However, if an area has small and detailed shapes to transfer I may shade the back of that area rather than just outline the shapes. 

**Note: There is additional information on transferring your image to a new surface on my YouTube video:  Quick and Easy Way to Transfer an Image to Watercolour Paper.


Awesome Opportunity - 2 Artist Retreats in the Shuswap

June 23-26 or September 15-18, 2023

Join me for 4 DAYS of Outdoor Sketching, nature walks, deck and beach time, creative conversations, gourmet meals and simply relaxing 

Your Hosts, Joanne Denis and Myself
Cost: $450 single room or $300 shared room
Art instruction, transportation, meals and lodging included (Bring your own art supplies.  
Space is limited to 6-8 attendees, Register Early 


Always  Available at Art by Wendy's Studio
Original work, Commissions, Private Drawing Lessons, Prints and Cards of her Work, 

Be sure to like and share my posts.  You won't miss a single post if you Follow by Email 
Have a great Artful Day,
Wendy

Sep 26, 2019

The Tears Free Way to transfer your Image - Painting and Drawing Tips

Fall means CURLING SEASON is HERE!!

Now maybe Curling isn't your thing but I curl twice a week and really enjoy it. This Friday will find me down at the rink throwing a few rocks and getting into the groove.  Next Wednesday night at 7 pm, the first game.  Before I play I need to be ready - shoes, grippers, broom, clothes, gloves, stretching, practice.

I Have my groundwork done before I start. . .

This little quail looked good in my sketchbook and now I want to do a Better Drawing.  I need to TRANSFER it to my drawing board. 

Getting a new picture/project underway requires the same attention to readiness. My recent worked with a new student pointed out a big whole in my readiness discussions on my blog.

The need for a TRANSFER. . .

What is a Transfer? Why do you need it?
When you layout your drawing, many of you like me, like to have some very detailed images in our work.  ie. I draw realistic birds and animals.  Have you ever tried to draw a bird?  Their beaks will drive you crazy.  I usually find I fiddle away with them forever: too long, too short, too fat, slanted the wrong way, . . .You know, all of those things and more.  If the beak isn't right. The bird is not right.
I work on Arches 140 lb cold press paper, special drawing boards or specialty papers for my finished pieces.  Erasing and redrawing will kill them.  The tooth of the paper is corrupted.  Whatever medium I am using graphite, watercolour or ink will highlight this patch on my paper. A corrupted piece support is no use to me.

So I need to do a TRANSFER . .

I draw my picture on a separate paper then transfer it onto my good paper/drawing board once all the bugs are worked out. ie. the 'beak' is right.  In this example I am using my little quail which worked really nice in my sketchbook and now headed for a more detailed drawing on my special drawing board. 

I got that, you are probably saying.  What's the big deal.  Well, no, you can't grab the old standby, carbon paper and trace you drawing onto your support.  That carbon will play havoc with your watercolours, your graphite, your coloured pencils, your pastels, . . .

The best TRANSFER is with graphite.  

Yes, There is such a thing as graphite paper for transfers but I find it expensive, found only in specialty art stores, and messy.  (It can leave lots of unwanted graphite on your work if not handled carefully)

Materials for TRANSFER: tracing paper, 2B pencil & 5B pencil.  Make sure the tracing paper is transparent.  

How to Transfer a Drawing onto your support without Graphite Paper:

1.  Tape a piece of tracing paper over the drawing you wish to transfer  (use painter's tape or other low tack tapes)
Step 1: Label this side 'Front' 

Trace the drawing with a pencil.(Dark enough to see clearly but not too dark).  use a 2B pencil. It is softer than an HB, it gives a dark line but will not to score your paper in your sketchbook.

Step 2: Label this side 'Back' - follow your drawing lines carefully so you put graphite on them

 2.  Remove the tracing paper from the drawing.  Turn it over.  Use a soft pencil, 5B to redraw the drawing on the back.  This is how you put graphite on the BACK of the tracing paper. Rather than graphite all over the tracing paper, it is just under the actual drawn lines.

Step 3: Play your image where you want it on the page before taping.  

3.  Place your tracing paper on your GOOD drawing surface, RIGHT SIDE of tracing paper FACING UP.  Tape it on one side so it is possible to flip it up without shifting it.  Draw the drawing by using a 2B pencil to go over your first Tracing.  (From Step 1).  Press hard enough to transfer the graphite on the back side onto your good drawing surface.  Make sure you are not scoring the surface of the good drawing surface.  You can flip the tracing paper up and down to check. You might have to touch it up a bit as you go.

Flip your tracing paper up to see how things are working out.  

4. Remove the tracing paper and the transfer is done.
My Quail is now on my drawing board ready for me to shade with my pencils.  Notice outline is dark enough to see but light enough to erase and it does not score the drawing board.  

OMG!! You are probably saying by now. "How many times do I have to draw the same thing." 3 Times for sure and if you count the touch up at the end, 4 times.  A bit of a drag, I agree.

 But  . . . your good drawing surface is in excellent shape.  And a big bonus, you have just studied your drawing 3 or 4 times in great detail.  You are now way more familiar with your subject and READY TO ROLL.

Added Bonus: If you use a grid to draw that detail, this means no worries to remove those grid lines on your special paper/support.

Only a Few Days Left:

My ART Treo Pop Up Gallery,  Last Day Monday, Sept 30
Open 11-5pm Daily 

Beecher Place, 12160 Beecher St. Crescent Beach

Wonderful venue to view my summer collection from Texada Island, I painted every day when we were there.  Also featured are Doris Biddle and Donna Schipfel, both have some awesome work to share with you.

Finish your Art tour with a walk on the beach walk (we are right beside it) and a special coffee or desert from the local shops.  Great way to spend a fall day. I will be at the Gallery on Saturday, Sunday and Monday.  See you there.

Looking to move your Drawing Skills to the Next Level?

Contact Me to Register ↓↓↓↓
Drop-In and Draw at the Pop UP GalleryMonday, September 30, 1-3 pm 1 Spots Left 
Beecher Place, Cres. Beach $20.  Get tips on old projects or new. 

Get Ready for Christmas!! with a Fun Way to Improve your Drawing Skills
This year's theme is Candles, Holly and Poinsettias

Christmas Card Classes 
Saturday, Nov 16, 10-12pm. Art by Wendy's Studio, North Surrey
Wednesday, Dec 4, 1-3pm. Gardenworks at Mandeville, South Burnaby
Treat your Friends to a Special Christmas Greeting
All supplies Incld $40      Contact Wendy

OR

Book a 3 Pack of Private Lessons with Me - 3 Lessons 2.5 hr each $225
Based on your Schedule at my Studio, N. Surrey. 

FYI
I am scheduled for a Demo at Opus this fall: 

 Drawing: Values, Light & Shadows Saturday, Oct 19, 11-12:30 or 2-3:30 Free 
Contact Langley Opus to Register  604.533.0601


My Etsy Store is always OPEN: Etsy - WendyMouldsArt

Originals, Prints, Commission Work and Instant Printable Cards for all Seasons available.

Be sure to like and share my posts to keep me coming into your box, 
You won't miss a single post if you Follow by Email or Like my Facebook Page.
Have a great Artful Day,

Wendy