
Do you remember when you were learning to Ride a BIKE?
It was hard. And the ground was hard. Road Rash was not fun.
Learning to draw confidently with a permanent ink pen is WAY easier!!
 |
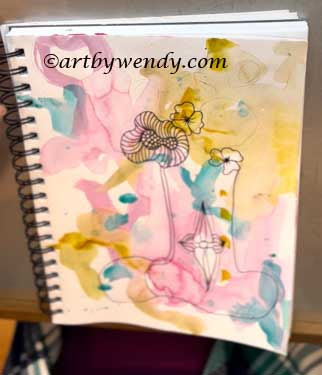
| Pink Flower Puff - Sketchbook Activity - Freehand Line Work |
I love drawing with black ink. I love sharp crisp lines. Although, I often use other colours, black is by far my favourite. Learning to draw with a pen, is all about mark making. Pen work can be used to add mass, to create shapes, to produce texture and enhance the flow of your work.
Creating interesting marks with your pen confidently is alot like learning to ride your bike. Learning a few basics before 'going it alone' really helps.
************
There is further discussion on this topic on my YouTube post: Become Friends with Your Pen - The Line
************
There is further discussion on this topic on my YouTube post: Become Friends with Your Pen - The Line
************
Wendy's Drawing with Pen 101
Start with Confident Line work that sweeps across the page.
First your materials:
- .05 or .08 Pigma Permanent Ink Pens.
(If your book is smaller than 9 x 12, use the smaller pen. I like black but they do come in other colours. Steadler pens are a great brand as well and come in these sizes)
(If your book is smaller than 9 x 12, use the smaller pen. I like black but they do come in other colours. Steadler pens are a great brand as well and come in these sizes)
- Multi Media Sketchbook: They have smooth paper for drawing on and will take water if you want to add watercolour (I use the Canson XL 9 x 12)
- HB pencil, kneaded eraser and vinyl eraser
- 3 favourite watercolours and a brush
That's it!
 |
| Make some interesting shapes with your watercolours |
1. Put a wash on your page: Paint 3 of your favourite colours on your page, making sure to make interesting shapes, keep the colours light, leave white spaces and take some of the colour out to the edges of the pages. Let it dry completely.
It is really hard to draw on plain white paper. It kills your confidence. Having colour on the page will really help you relax and just draw. Try it.

2. Loosely Draw a Flower Vase: No perfection here. Take a pencil and lightly draw a vase that is an interesting random shape. Don't worry about symmetry. Once you have the shape, draw it in one long continuous line with your pen leaving the top open for the flowers that will cover part of it.
Outline a design on the vase loosely with a pencil and then use your pen to draw it. Don't trace over the pencil lines just use them as a guide. Add the details as well - freehand.
 |
| Flower 1: Draw an elongated shape with a center, echoing the shape |
3. Draw your Flowers: For this project I will introduce you to 3 different flowers. Each is to be done freehand with your pen. The first one will be an odd loose shape and the other two will be circles. Not perfect circles. Just loose circles.
 |
| Flower 2: small .5 inch circle with a small circle in the center. |
Use a pencil to draw the flower's shape and centers. For the little flowers (Flower 2) use your pen to fill in all the details: 3 petals, darken the center and a few directional lines in each petal. For Flower 3 - The Carnation type flower, draw circles of wiggly lines. The first circle is small, the center and then do several rows around it, to get the size you want.
 |
| Flower 3: Circles of Wiggly Lines |
Draw loose flower circles behind and above your basic 3 flower shapes to fill your vase. Be sure and have some peeking out from behind, some hanging over the edges and others reaching for the top.

4. Take a flower break: Draw lines from the top of your vase to the bottom leaving your design shape in the middle untouched. Draw the lines freehand, sweeping down the page in a continuous manner. They do not have to be an exact distance apart. Let them follow the flow of the vase.
 |
| Add a few embellishments as you fill up your Vase - WIP. |
5. Add Embellishments: Add some darks using leafy branches, sweeping little lines with little black circles and longer droopy leaves. I also grounded my vase by putting a lined mat under it.
6. Lightly paint your vase and mat: I painted my vase with a light wash of the pink, to make my flowers pop. I also added a light shadow under the flowers that spilled over the edge of the vase. I then painted the mat a slightly darker pink.
6. Lightly paint your vase and mat: I painted my vase with a light wash of the pink, to make my flowers pop. I also added a light shadow under the flowers that spilled over the edge of the vase. I then painted the mat a slightly darker pink.
 |
| Pink Flower Fluff - Sketchbook Activity - Freehand Line Work |
************
There is further discussion on this topic on my YouTube post: Become Friends with Your Pen - The Line
There is further discussion on this topic on my YouTube post: Become Friends with Your Pen - The Line
Taking Registrations for my Spring/Summer Events:
- Join me in the Shuswap for a 4 Day Outdoor Sketching Art Retreat hosted by Joanne Denis, June 20-23, 2025. I will be the instructor. This is an all inclusive: food, instruction, accommodations and drive from Lower Mainland. $350-$600 depending on the room choices. www.aventurasbc.ca
- Come join me for An Adventure - Let's go Outdoor Sketching 2.5 hr $65. This is small group instruction. Contact me to set up a date. Location: Lower Mainland
- Save the Date: next set of 3 Zoom classes Thursdays, October 9, 16 & 23. Enhancing Your Drawing & Painting Skills. New focus for each set of classes
Original work, Commissions, Private Drawing Lessons, Prints and Cards of her Work,
Be sure to like and share my posts. You won't miss a single post if you Follow by Email
Have a great Artful Day,
Wendy


